
Welcome to our November Release Blog Hop!! I don't know about you, but I can't wait to see what the JustRite Design Team has created with this months release!!
Just a Reminder that we are celebrating our November Release with a sale.
 Great Justrite/ Spellbinder's Video Tip:
Karen Hunsaker, one of Spellbinder's Design Team Members has a great tip on how to perfectly diecut your JustRite images using Spellbinders Dies. She is such a sweetheart because she has a video tutorial to show you exactly how you can get a perfect cut everytime!! It is a great tip and everyone should watch her You Tube Video. You can view it by
clicking here. I have also loaded it on the Video Tutorial Section on our sidebar so that you can reference it at a later date. Thank you Karen for sharing your great tip in video format!! Please be sure to leave Karen a little love when you visit her blog. This was her first Video Tutotrial!!
Today on the JustRite blog - I thought that I would share with you some great Christmas Gift Ideas for the super hard to shop for people on your list. The ones that have absolutely everything!!

I started with this gorgeous silver embossed journal which I purchased at Office Max. I fell in love with the copper and silver embossed cover and very cool silver clasp. I decided that it would be the perfect desk accessories to personalize.
I am absolutely in love with the new square borders in the 2" Decorative Monogram Kit, the borders are a variety of widths and are so elegant. To design my project I selected the border from the kit that best coordinated with my journal. I stamped the image with a versamark watermark pad and embossed the image with super fine detail embossing powder from Ranger. I used a copper Krylon leafing pen to edge the stamped image. For my mat I used the Spellbinder's Fleur De Lis Pendant die and die cut it using Foil paper from American Crafts. Then I layered it on black cardstock die cut into a Scalloped Square. Then I accented it with silver metallic pearls from Michael's Recollection Collection.
JB-08345 Decorative 2" Square Monogram Kit
This monogram kit includes a 2" Square Wood Stamper, 4 Square Borders, 95pt uppercase Special Occasions font set (36pcs), 50pt uppercase Spec Occ font set (92pcs), and an uppercase 15pt Spec Occ font set (264pcs)-- that's 392 characters!
For my next project I altered an address book also from Office Max. Here is the address book before I personalized it.

Here is my decorated version:

For this address book I used the JB-08340 Deluxe Monogram Kit- 2" Round 
This monogram kit includes a 2" Round Stamper, 4 Borders, 95pt uppercase Times New Roman font set (36 pieces),50pt uppercase TNR font set (92 pieces), and an uppercase 15pt TNR font set (264 pieces)-- that's 392 characters!
 Then I embellished an 8 1/2" x 11" notepad with a magnetic glasp. The black edge is magnetic.
Our decorative round 2" border was the perfect design for altering this book. I added Fleur de Lis Red cardstock punches (Martha Stewart Punch) and metallic rhinestones. I also added strips of paper to the black edge of the notebook which in it's original state was just plain black. For an additional accent I attached a metal Fleur De Lis Charm on top of the bottom red cardstock fleur de lis. Here is a photo of the gift set.

These were quick and inexpensive ---don't they look like a million bucks with the custom embellishments!!
Check out what the rest of the team designed:
Barb SchramBecca Feeken- is having computer issues- but I linked a great Hip to be Square Project that she designed last week!
Debbie OlsonHeidi BlankenshipKathy JonesKellie FortinAngela BarkhouseLauren MeaderLisa SomervilleMichele KovackMichelle WoodersonSharon HarnistSharon JohnsonKeep us in mind....."When it needs to be JustRite".


 You can start your November Release Inspiration at Michelle Rodger's blog with this great Christmas card which combines the new 2" decorative borders with the Have A Merry Little Christmas Stamp Set.
 Then you will want to stop by Denise Marzec's blog the Paper Landscaper to see here beautiful birthday card using the Happy Birthday Image from our Just A Note stamp set.
 Next stop for today's sneak peeks is Laurie Schmidlin's blog -Just Give Me Stamps to see this beautiful card created using the new 2 decorative squares.
 The little metal container has some pink and white socks for the little wee baby and a 12x12 strip of Basic Grey Sultry is wrapped around it. I thought the bootie image was perfect for this cute little container of socks (and yes - I LOVE socks as you probably noticed from day 3's project :)
 I LOVE that I could personalize this gift with my cousin's name and his wife's name - it says: Congratulations: with the names of my cousins' written with Just Rite fonts (Times Roman 15pc). The fun thing is that even thought this bootie stamp is an oval one, after stamping it, I cut it out with some circle spellbinders and then created some layers :)
  Its always so nice to get a card/present in the mail and even nicer I think when it is personalized with your name on it :) Today Just Rite is having an amazing Sale and I can't wait to shop (in my PJ's sipping on some hot cocoa :) A huge thank you to Kellie for everything that she does and for all of you for visiting! I hope you enjoyed the projects this week as much as I enjoyed making them!!
.JPG)
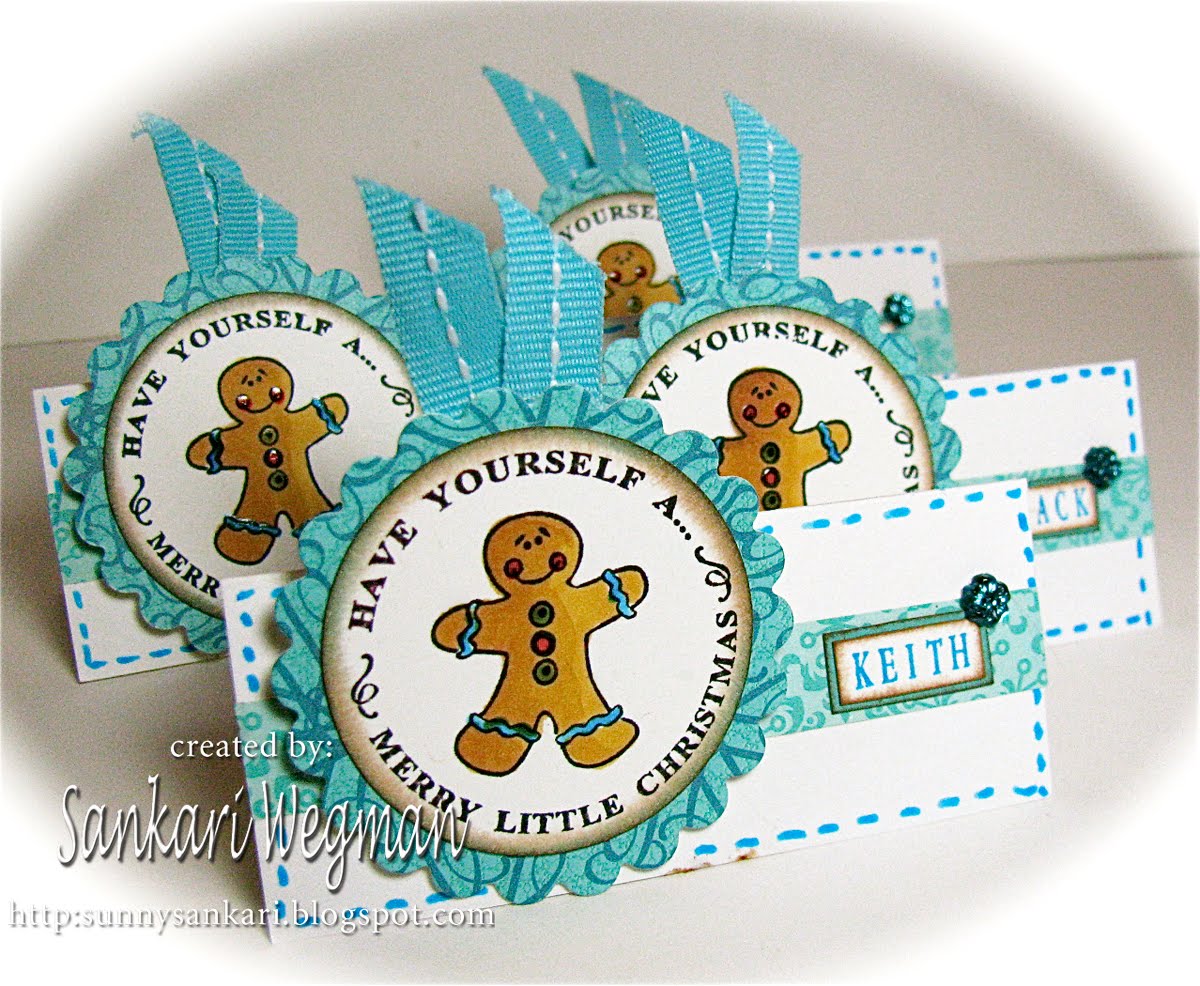
.JPG) Here is view of the place cards with the stamped sentiment: Have Yourself a Merry Little Christmas: I colored in the cute gingerbread men with copics and then went over it with some glaze pens:
Here is view of the place cards with the stamped sentiment: Have Yourself a Merry Little Christmas: I colored in the cute gingerbread men with copics and then went over it with some glaze pens:.JPG) Wishing you a Merry Christmas: The images are colored with copics and then covered with a glaze pen.
Wishing you a Merry Christmas: The images are colored with copics and then covered with a glaze pen. .JPG)


 For the card, I cut out a cared stock and then punched with the lattice edge punch the inside of the card and then cut it a little shorter in the front of the card. So when the card is lying down it looks like this:
 I arranged all the elements on the card and then punched out a circle with my nesties and then on the inside of the card I added the snowflakes are winter's butterflies sentiment which is covered with chunky glitter and then I layered with nesties and decorated with liquid pearls and sponging :)
  It's so nice to have such variety of choices of borders and images to mix and match and there is something about circle stamps where the sentiment is also circular that is just so fun to stamp with! I hope you enjoyed this project and gift idea :) and I hope you come back tomorrow for a little project to make your holiday dinner very special!!!
 Each the bottom of the box is covered with a strip of the DP and then the sides of the top of the box were colored with copics. I stamped the sentiment twice onto the yellow cardstock and then stamped the border and then cut it out and popped it up on dimensionals over the sentiment so that it created a little frame over the sentiment. Here is a picture of the oval boxes together:
 and this is a side view of the oval boxes:
 +by+Sankari+Wegman.JPG) This oval box features the sentiment:
This oval box features the sentiment:+by+Sankari+Wegman+(2).JPG) This oval box features the sentiment:
This oval box features the sentiment: .JPG)
 I created a card with the sentiment:
  I completely enjoyed making these projects and hope you enjoyed them too! It was so much fun to "oval it up!" and create some oval present boxes to put little holiday gifts in!


 A special thanks to the 2 Sketches 4 You design team for all there incredible JustRite projects in 2009. Girls you Rock!!!


