
Last week's BLOG CANDY WINNERS -Congratulations Leenda you are the winnner of the JB 08775 Something Sweet Stamp Set with the 2 3/8" Stamper is:
Random Integer Generator
Here are your random numbers:6
Timestamp: 2009-08-18 01:22:18 UTC
Leenda said:
do have a custom stamp w/my name but I've never thought about doing my own. That's a great idea! Why didn't I think of it??
August 13, 2009 8:46 PM
The winner of the JB 08780 Merry Little Christmas Set with the 1 5/8" stamper is from Friday's Release post is Stampin Jan :
Random Integer Generator
Here are your random numbers:85
Timestamp: 2009-08-18 01:28:26 UTC
Yes, actually I recently have been getting my Christmas card mojo into action. I usually make about 80 hand-stamped cards. I came up with the design, now I just have to begin the assembly line process and start stamping.
August 15, 2009 8:49 PM
Ladies please send your full names and shipping information to kellief@justritestampers.com
Just in case you haven't gotten your Chirstmas Mojo yet... Michele Kovack will be guest blogging this week with 5 Days packed full of more Christmas Projects you won't want to miss. Michele is known for her vintage shabby chic designs and today she has used JB 08760 The Christmas Treasures Set to create these oh so Vintage Christmas Cards:
So here is Michele and her fun vintage creations: I love that the images in this set are large and become center stage on the card! I inked the sentiment in blue on a grey piece of Memory Box paper. It has an aged feel to it which I liked! The outer portion was stamped in grey and carefully cut with scissors. I didn't want it to blend in too much with the background so I backed it using my Spellbinder's pinked Nestibility.
 I layered it on top of my cute snowman Memory Box paper. I slipped a piece of white tulle underneath image and glued everything down. I tied the tulle into a know and added a crystal beaded snowflake on top of it. Since I love anything that sparkles, I added glitter around the sentiment as well as rhinestones!
The second card was not done in very traditional Christmas colors. I found this piece of creamy snowflake paper which I think is by Basic Grey and kind of used that for inspiration. The image was also from the Christmas Treasure's set. It was stamped in Versamark on chocolate brown paper and then sprinkled with dark brown embossing powder. After heating it up, I cut it into a circle with my Nesties.
 The outer sentiment was stamped on Kraft cardstock in Versamark and sprinkled with gold powder. To make this pop a bit more I used a new pendant die from Spellbinders to layer the circles on. I rounded the corners of the card and added a simple bow.
Stop back in tomorrow for more Christmas Inspiration.

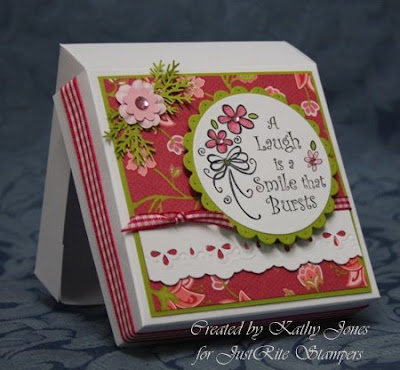 I used white card to make up the box as per the instructional tutorial and then set about decorating the top. I used a piece of 3 ¾” Kiwi Kiss and layered with some Raspberry Tart DSP. I took a piece of left over white card and punched the edge using the Fiskars Embossing Eyelet Lace border punch and glued it to the bottom third of the panel and added some hot pink ¼” gingham ribbon. The flower is made using the Martha Stewart Branch punch for the branches, a Kaisercraft baby pink flower, punched the middle flower out of Pretty in Pink with the Boho Flower punch and finished with a pink Kaisercraft rhinestone. The main panel I stamped using the brand new Friendship Set by JustRite in black and coloured the flowers with markers and a blender pen, added more pink rhinestones to the centres and cut out with my Large Classic and Scalloped Circle Nestabilties. I finished off the box by adding some 1/2” hot pink gingham ribbon around the lid.
 A friend of mine, when she saw the other previews, asked if I would use it much because it is so big. I told her there are so many ways you can use it, so today I made little 3 x 3 gift cards with this set. I stamped three different centres from the set and cut each out in different shapes. (Just because it comes in a circle doesn’t mean you have to cut it in a circle!!) I could have made bigger cards to fit in this box, but I just love these cute scalloped cards made with the largest of the Large Mega Scalloped Rectangles by Spellbinders, which when folded becomes the perfect 3 x 3” card!
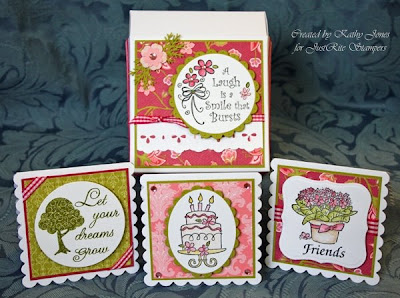


 To see the full card and a complete tutorial on how she created this fabulous card visit her
  This super cool project from Sharon Harnist - a perfect project to help your kids count down the days to Summer Break. What a great new family tradition!! Sharon used an image from our new Favorite Occasion set designed to fit in your 1 5/8" stamper.
 Then we have this simply elegant card from Sharon Johnson's Friday Stamp Simply Challenge!!
 Or this beautiful Mother's Day gift from Lisa Somerville
 The borders from this set are designed to fit in the first rim. I have some more photos showing this new block to share with you. But I am experiencing photo upload issues with blogger at the moment. Hopefully I will be able to upload them tomorrow. Stop back for our Blog Candy Celebration - Wahoo!! We hit 300,000 hits!!
 The buggy is made by cutting a Spellbinders Standard Circle Large in half and then the hood is made by turning a half circle on a 90 degree angle. The wheels are made by stacking the circles from two punches. The handle is a swirl taken from Spellbinders Doodle Parts. The scalloped trim is cut from a Martha Stewart Edger.
 The words were embossed stamped with a Versamark pad and either gold or silver embossing powder. It was well worth the time to stamp and emboss the words before cutting them out.
 Here are the items I used –


 Here is what the set looks like with some of the medallions mounted.
 The medallions were made using JustRite 10 Designer Centers and Borders and the


 A LIFESAVER THANK-YOU!
 Using my
 I decided to place my letters, U, R, A, in the inside for this card.
 Have you guessed the play on letters and words yet? How simple is “U R A Lifesaver” for a special thank you card? The beginning steps of creating this card is the same as the card above. The main differences is; punched letters are on card front, added button on flower, no ribbon wrapping card front, and adhesive pearls on right hand side of cardstock band. I love the sparkle to this paper!
 I also placed the letters on this card front. And wrapped the satin ribbon around card front and tied it off as the flower center. Take a peek at the photo below to see how simple it is to accomplish this!
  When I want to incorporate ribbon into my flower embellishment, I simply punch two holes in the center. Just like a two hole button. I bring up both ribbon ends through the holes and tie the ribbon, snug enough to hold, but not too tight to bend the cardstock! I love this look and have been using it often lately! I add a glue dot under the flower to hold in place.


