Today there are lots of other JustRite Projects that you will want to check out. For monogram inspiration visit Sharon Johnson's Blog and Kellie Fortin's Blog. Michelle Kovack has a very personalized tag to share with you as well.
If you live near Albert Lea, MN JustRite Design team member Heidi Blankenship will be doing this Saturday at Scrapping On The Go from 1-3pm. She will be demoing Spellbinders and JustRite Stampers products. Showing you several techniques with both products and how perfectly they go together. She will also be doing a make-n-take so you can get some hands on experience with 0ur products. If you live in the surrounding area I hope you will stop in at Scrapping On the Go for the Demo, I would love to see you there!!
Scrapping On the Go!
** Store ** Location1428 W. Main StAlbert Lea, MN 56007(Prairie Center - across from the Skyline Plaza)
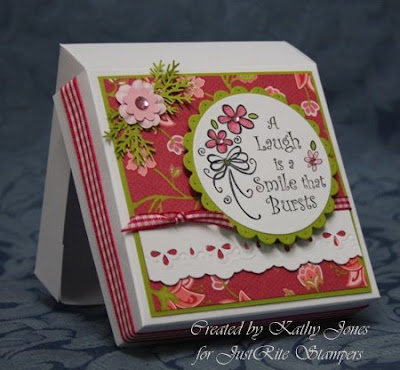
Welcome back to my last Guest Blogger day! I can’t believe it’s my last day already – I’ve had a wonderful time this week. Today’s project is a Mini Pizza Box and some matching 3 x 3 gift cards. I found this awesome tutorial for this Mini Pizza Box at Splitcoaststampers - It is such a lot of fun and SO easy to make and only uses 1 sheet of cardstock!
 I used white card to make up the box as per the instructional tutorial and then set about decorating the top. I used a piece of 3 ¾” Kiwi Kiss and layered with some Raspberry Tart DSP. I took a piece of left over white card and punched the edge using the Fiskars Embossing Eyelet Lace border punch and glued it to the bottom third of the panel and added some hot pink ¼” gingham ribbon. The flower is made using the Martha Stewart Branch punch for the branches, a Kaisercraft baby pink flower, punched the middle flower out of Pretty in Pink with the Boho Flower punch and finished with a pink Kaisercraft rhinestone. The main panel I stamped using the brand new Friendship Set by JustRite in black and coloured the flowers with markers and a blender pen, added more pink rhinestones to the centres and cut out with my Large Classic and Scalloped Circle Nestabilties. I finished off the box by adding some 1/2” hot pink gingham ribbon around the lid.
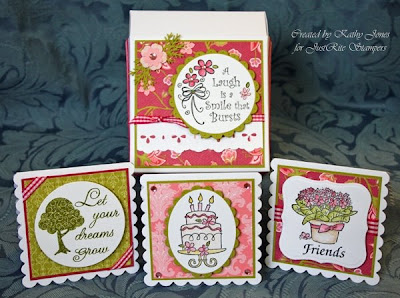
 A friend of mine, when she saw the other previews, asked if I would use it much because it is so big. I told her there are so many ways you can use it, so today I made little 3 x 3 gift cards with this set. I stamped three different centres from the set and cut each out in different shapes. (Just because it comes in a circle doesn’t mean you have to cut it in a circle!!) I could have made bigger cards to fit in this box, but I just love these cute scalloped cards made with the largest of the Large Mega Scalloped Rectangles by Spellbinders, which when folded becomes the perfect 3 x 3” card!
The ‘Let your dreams Grow’ card has been stamped in Old Olive and cut with Circle Nestabilities. The panel below is Rose Red layered with Raspberry Tart DSP and some ¼” hot pink gingham added to the corners. The main image panel has been popped up on foam tape.
The Cake centre was cut with the Large Classic and Scalloped Oval Nestabilities, coloured with markers and I pierced each of the scallops and popped it up over a panel of Kiwi Kiss and Raspberry Tart DSP with pink rhinestones in the corners.
The Friends centre was cut using the Label 1 Nestabilities, embossed the edge and coloured with markers. This was popped up on a panel of Kiwi Kiss, Raspberry Tart DSP with a ½” hot pink gingham ribbon.
The finished product is this cute, easy little gift set!

I hope you’ve enjoyed the projects this week as much I as enjoyed making them. Thank You to all those who visited and the JustRite Team for having me!!!
xx Kathy


6 comments:
The box and cards are adorable!! A box with the cards is a great small gift idea for a hostess or even when visiting a friend in the hospital. If giving it to a hospitalized friend include the stamps and a small pen . Thanks for sharing!!
Gorgeous box and cards. Thanks for sharing your talent this week.
what fun - thanks for the inspiration - you really have me motivated here to create!
Sandra
Your pretty and box and cards are just such a good idea. I've enjoyed your tutorials so much --thanks.
I love this project and will certainly try it.
Thanks for sharing.
Linda D.
Oh my gosh, what an AWESOME set!! Gorgeous work, Kathy!
Post a Comment