
In Celebration of Sharon's Unbelievable week here on the Just Blog we are having a huge
Thanksgiving Sale. Buy one of our favorite products and get the second one free.( 5 different items are included in this sale) For more details on the items that are on sale see Thursday evenings post by clicking here. To start your shopping spree click here
My final project for this fun week at the JustRite Blog wishes you all a Merry Christmas!!! Oh, what a fun little project. This is an accordion card measuring 3.5” high x 30” long. It’s so much fun to decorate up all of these little 2 x 3.5” canvases!!! Now this wasn’t the easiest project to photograph, so these pictures are pretty much only parts at time, but I think you’ll be able to see it well this way. I tried to get a full shot of the entire project for you here.
.JPG)
My 15 panel accordion card spells out MERRY CHRISTMAS – how fun. To spell out the MERRY CHRISTMAS I used JustRite’s Clear Letters. I love the size of them and the fact that you can actually SEE where you are stamping. It was so easy to stamp the letters onto the 1 ¼ “ squares I made for them. I’ll include full instructions at the end of this post, but I’ll show you the entire project first.

Here we have the MERRY. As you can see, I used all SU product, except for the Clear Letters by JustRite and the small words spelling out the message, which are from the Christmas Ensemble by JustRite. I decorated each panel with Ski Slope DP, edged in gold paint pen, added my letter panels and decorated. Aren’t the jingle bells cute! They are run through an SU Jumbo Eyelet set on top.

One panel separating the 2 words holds a Christmas tree from Christmas Classics – how fun. It is white embossed. I made the snow by tearing a piece of white, covering it with Liquid Applique, sprinkling on Dazzling Diamonds and then heat setting. LOVE that look!!! My tree also has a star on it, again sparkling with Dazzling Diamonds.

All the little words in white that run across the panels give a message – it is *Special Friends and Hugs and Kisses and Holiday Wishes*. I merely stamped those 2 stamps from the Christmas Ensemble onto white and cut out the words in a haphazard style, ran them through my Xyron X and stuck them on. I think it makes it fun!!!
 And here’s the end of the line!!! The stars are from Christmas Classics, white embossed, and punched with the large Star Punch – quick and easy on a project like this. The snowflake from Scandinavian Season is also white embossed onto red paper, then punched with the 1 ¼” punch and matted with the 1 3/8” punch.

Here’s a look at the accordion tag all bundled up and tied with a ribbon, ready to give to someone! I would have made a box for this accordion tag to be presented in, but just ran out of time. If anyone would like a template for a box for this tag, just indicate so in the comments below and I’ll get one made up and posted on my Blog next week.
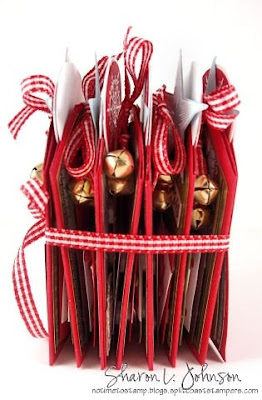 Just showing you a side view of the bundled up tag – fun!!!
.JPG)
Ok, now on to a bit of instruction in case anyone would like to try this. We’ll start with cutting and scoring our paper. Cut 2 strips 3.5 x 11 and 1 strip 3.5 x 10.

Starting with an 11” sheet, we need to score every 2 inches, flipping the paper each time as we are creating mountain and valley folds. I used my Scor-It Mini. Score the first time at 2”. Flip your paper over, place your score at the 2” marking and score again. Flip your paper again, move your LAST score to the 2” marking, and score again. Continue until you only have 1” of paper left – this is your tab to join the pieces together. Repeat for 2nd 11” sheet. When you score the last 10” sheet, it’ll work out perfectly with no left over paper.
.JPG)
Once your DP pieces are set to go, adhere them to the red card base you made. Now make up your letter panels with the Clear Letters. I cut my letter squares to 1 ¼” square, stamped my letters in Real Red, then cut my mats to 1.5” square. As you can see, I matted them in all random ways, just for fun, and used a colored brad on each for decoration. My letters are adhered to the base with 4 SU Dimensionals on each. My stars on top are mounted with 1 Dimensional. The snowflakes are taped on the front, then another white circle was taped on the back, just to give a cleaner appearance. The jingle bell ribbon is run through a jumbo eyelet and tied in to a bow.
And that should about do it!!! Hope you give this a try. You could choose a shorter word --- like JOY – LOL!!! Sure would have made the photography a lot easier – LOL!!! Whatever you choose have fun, and I’d sure love to see what you come up with!!!
I’d just like to give JustRite a HUGE THANK YOU for having me this week – it’s been fun and pushed me to get some projects done that would probably be still only floating in my head, and for that I’m grateful!!! I’ve been having so much fun with all my JustRite products this past year – if you don’t have any yet, I strongly recommend you give them a try – a simple Monogram Starter Kit would be a good first choice to get your feet wet, and after that you can dive right in!!!! (And I just noticed they are having a HUGE sale – WOW!!!) Thanks everyone - -it’s been fun!!! See you on my home turf soon!!!
JustRite Stamps: Clear Letters and Christmas Ensemble used with Harmony Classic Circle Stamper III
SU Stamps: Christmas Classics and Scandinavian Season
Paper: SU Real Red, Old Olive, Chocolate Chip, Baja Breeze, Ski Slope DP, and PTI White.
Ink: SU Real Red, Versa Mark, Versa Fine Onyx Black, Sanford Gold Coat Pen.
Accessories: Scor-It, White Embossing Powder, Glue Pen, Dazzling Diamonds, Liquid Applique, Brads, Jumbo Brass Eyelet, Gingham Ribbon, Jingle Bells, Dimensionals, Two Sided Tape, Cropadile, and Punches: 1 ¼”, 1 3/8”, Small Star, Large Star.
I tried to get a full shot of the entire project for you here.My 15 panel accordion card spells out MERRY CHRISTMAS – how fun. To spell out the MERRY CHRISTMAS I used JustRite’s Clear Letters. I love the size of them and the fact that you can actually SEE where you are stamping. It was so easy to stamp the letters onto the 1 ¼ “ squares I made for them. I’ll include full instructions at the end of this post, but I’ll show you the entire project first.
Here we have the MERRY. As you can see, I used all SU product, except for the Clear Letters by JustRite and the small words spelling out the message, which are from the Christmas Ensemble by JustRite. I decorated each panel with Ski Slope DP, edged in gold paint pen, added my letter panels and decorated. Aren’t the jingle bells cute! They are run through an SU Jumbo Eyelet set on top.
One panel separating the 2 words holds a Christmas tree from Christmas Classics – how fun. It is white embossed. I made the snow by tearing a piece of white, covering it with Liquid Applique, sprinkling on Dazzling Diamonds and then heat setting. LOVE that look!!! My tree also has a star on it, again sparkling with Dazzling Diamonds.
All the little words in white that run across the panels give a message – it is *Special Friends and Hugs and Kisses and Holiday Wishes*. I merely stamped those 2 stamps from the Christmas Ensemble onto white and cut out the words in a haphazard style, ran them through my Xyron X and stuck them on. I think it makes it fun!!!
And here’s the end of the line!!! The stars are from Christmas Classics, white embossed, and punched with the large Star Punch – quick and easy on a project like this. The snowflake from Scandinavian Season is also white embossed onto red paper, then punched with the 1 ¼” punch and matted with the 1 3/8” punch.Here’s a look at the accordion tag all bundled up and tied with a ribbon, ready to give to someone! I would have made a box for this accordion tag to be presented in, but just ran out of time. If anyone would like a template for a box for this tag, just indicate so in the comments below and I’ll get one made up and posted on my Blog next week.
Just showing you a side view of the bundled up tag – fun!!!Ok, now on to a bit of instruction in case anyone would like to try this. We’ll start with cutting and scoring our paper. Cut 2 strips 3.5 x 11 and 1 strip 3.5 x 10.
Starting with an 11” sheet, we need to score every 2 inches, flipping the paper each time as we are creating mountain and valley folds. I used my Scor-It Mini. Score the first time at 2”. Flip your paper over, place your score at the 2” marking and score again. Flip your paper again, move your LAST score to the 2” marking, and score again. Continue until you only have 1” of paper left – this is your tab to join the pieces together. Repeat for 2nd 11” sheet. When you score the last 10” sheet, it’ll work out perfectly with no left over paper.
To get the tag shape on top I made templates. Using a gridded surface with a diagonal line (I used my Scor-Mat) you can draw the diagonal, cut your template, then lay your template on top of your red base and cut easily with scissors. To make the DP panels for the base, cut the pieces 1 ¾ x 3 ¼. You’ll have to make another template for them as they are smaller. Do it in the same way as above. Once the DP pieces are cut and corners clipped, line all the edges with a Gold Paint Pen. If you’ve never done this before, check out this little tutorial written by Debbie Olson – it’s exactly how I do it and it words fabulously!!!

Put a strong double sided tape on the tabs and connect all the pieces, as shown in photo. Pay attention to your mountains and valleys so you get them connected properly.

Put a strong double sided tape on the tabs and connect all the pieces, as shown in photo. Pay attention to your mountains and valleys so you get them connected properly.
Once your DP pieces are set to go, adhere them to the red card base you made. Now make up your letter panels with the Clear Letters. I cut my letter squares to 1 ¼” square, stamped my letters in Real Red, then cut my mats to 1.5” square. As you can see, I matted them in all random ways, just for fun, and used a colored brad on each for decoration. My letters are adhered to the base with 4 SU Dimensionals on each. My stars on top are mounted with 1 Dimensional. The snowflakes are taped on the front, then another white circle was taped on the back, just to give a cleaner appearance. The jingle bell ribbon is run through a jumbo eyelet and tied in to a bow.
And that should about do it!!! Hope you give this a try. You could choose a shorter word --- like JOY – LOL!!! Sure would have made the photography a lot easier – LOL!!! Whatever you choose have fun, and I’d sure love to see what you come up with!!!
I’d just like to give JustRite a HUGE THANK YOU for having me this week – it’s been fun and pushed me to get some projects done that would probably be still only floating in my head, and for that I’m grateful!!! I’ve been having so much fun with all my JustRite products this past year – if you don’t have any yet, I strongly recommend you give them a try – a simple Monogram Starter Kit would be a good first choice to get your feet wet, and after that you can dive right in!!!! (And I just noticed they are having a HUGE sale – WOW!!!) Thanks everyone - -it’s been fun!!! See you on my home turf soon!!!
JustRite Stamps: Clear Letters and Christmas Ensemble used with Harmony Classic Circle Stamper III
SU Stamps: Christmas Classics and Scandinavian Season
Paper: SU Real Red, Old Olive, Chocolate Chip, Baja Breeze, Ski Slope DP, and PTI White.
Ink: SU Real Red, Versa Mark, Versa Fine Onyx Black, Sanford Gold Coat Pen.
Accessories: Scor-It, White Embossing Powder, Glue Pen, Dazzling Diamonds, Liquid Applique, Brads, Jumbo Brass Eyelet, Gingham Ribbon, Jingle Bells, Dimensionals, Two Sided Tape, Cropadile, and Punches: 1 ¼”, 1 3/8”, Small Star, Large Star.
Keep us in mind....."When it needs to be JustRite".


28 comments:
Oh my goodness Sharon, this is waaaaaayyyyyyyyyy beyond stupendous. Speechless!
Marion, UK
Sharon, words can't even express what a terrific job you have done with the Merry Christmas card. My oh my, it is amazing.
Everything you have created this week is truly awesome and I know JustRite is so excited to see how well you have used their products.
Thank you for all your hard work!!!
Joan
Joan
Sharon, Your projects this week have been, as usual, totally spectacular. I bet JustRite's sales have boomed this week! Thank so much for sharing yout time with us.
...and of course, we want the tutorial for that box! :-)
What a wonderful project! Amazing work, Sharon!
OMgosh...this is incredible, Sharon!! I love this idea, and all of your fantastic details!!!
Holy cow! This is a FABULOUS project Sharon....thank you so much for sharing how you did it!
I'm totally speechless! Oh my word, I'm totally speechless. Sharon you're really stretching my vocabulary girl! Marion said it correctly . . . beyond stupendous! I think we're going to have to create a stamping throne and place you on it with a gorgeously paper created, jeweled crown. You're the Queen!!!
Wowee! Pretty amazing stuff! Just gorgeous!!!
Sharon, I had to come back to add, this would be a perfect photo tag album as well. Take photographs on Christmas morning and adhere them to the reverse side of the tag. What a fabulous mini album as well!
That is just beyond adorable! What a cute little thing to have sitting around.
Hi, SO BEAUTIFUL and cute! I can't wait to make one - please put up box template measurements! Thanks so much.
What can I say...it's all been said! What a fabulous, stupendous project and week!!! Thanks for sharing your lovely work.
This is awesome!!!
Fabulous week of projects Sharon!!
All the projects this week have been wonderful!!! You are so talented!
Oh Sharon - I knew you were good, but WOW, this is awesome! Thanks for sharing and posting the instructions to cut the tags. I may make this for a very special person ... and of course you know we are all going to ask for that box template too! lol. Thanks so much for sharing.
Susan
This is so cool, Sharon. I am definitely going to CASE this one! I like how you tied it all together with the gingham ribbon.
this is soooo neat. Please show us a template. And thanks for the instruction on how to make it.
WOWZA! Awesome job on this! I would NOT want to give this away!
LeAnne
That is the most awesome project I have ever seen! It is beautiful! Great Job!!!
Wowzers!!!! That is one stunning project!!!!
Thanks so much for sharing this with us! I made one this evening (when I shoulda been doing housework and now sleeping). Thanks again! I love this project and will send folks over from my blog when I post.
This would make a perfect gift. Thank you so much for the instructions.
Fantastic!!!!! Thanks for sharing.
Thanks Sharon. What a great project. I think it might also make a good mini Christmas Album.
All I can say is O - M - G !!!!
This is just jaw dropping dead gorgeous!!! Are we allowed to CASE???!!! I am so in love with everything I have seen with these Just Rite stamps!!! Great Job Sharron, you are AWESOME!!!!!
thud . . . . .
oops, I just fell out of my chair. What an AMAZING creation!
Love Sharon's works of art!
I would love the directions for the box. I 'm going to make this for my daughter's friend this weekend for her bday card. She is going to love it.
kim
stampstampstamp@sbcglobal.net
Post a Comment