
Believe! What a fabulous sentiment for this time of year – whether we are referring to a child’s belief in Santa or our more mature belief in Jesus Christ as our Lord and Savior who was born on Christmas Day, I just couldn’t let this series of Christmas posts go by without making good use of Believe! It is included in the Harmony Classic Oval Stamper II Ensemble. This series of Christmas cards are basically unrelated, individual cards, but all bear the common sentiment of Believe -- actually the ONLY stamping on any of these cards is the single word sentiment of Believe. And that’s the secondary theme of these cards – QUICK!!! Rather than stamp our images, I thought today we would concentrate on pulling beautiful images from elsewhere – somewhat of a recycling project as well!!! I’ll explain each card as we go. Here’s the first.
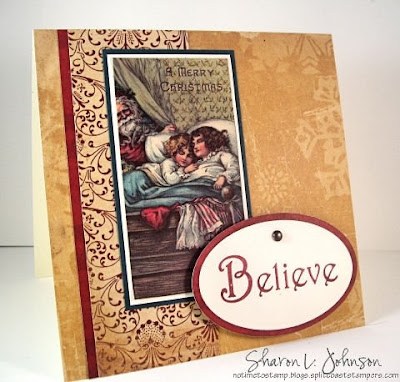
A warm and cozy card. Oh, long gone are the days when our boys were young and DID believe in Santa – how time flies!!! My main image was cut from a sheet of vintage Christmas images by Flair. I double matted it and then just played with DP pieces by Cosmo Cricket. My Believe is stamped without the border as I needed it to be smaller to fit my space, and is mounted on dimensionals. To make similar cards you can purchase preprinted images in so many places. Crafty Secrets has their Cotton Scraps which I am particularly fond of as well, but I just didn’t have any Christmas images in the Cotton Scraps. This card is 5.5” square.
Stamps: Classic Harmony Oval Stamper II Ensemble
Paper: SU Very Vanilla. Prism Island Mist Dark. Cosmo Cricket Oh Joy and Wonderland. Flair Vintage Santa Postcard Sheet.
Ink: SU Baroque Burgundy Marker.
Accessories: Petite Oval Nestabilities, Copper Brad, Mounting Squares.
Stamps: Classic Harmony Oval Stamper II Ensemble
Paper: SU Very Vanilla. Prism Island Mist Dark. Cosmo Cricket Oh Joy and Wonderland. Flair Vintage Santa Postcard Sheet.
Ink: SU Baroque Burgundy Marker.
Accessories: Petite Oval Nestabilities, Copper Brad, Mounting Squares.
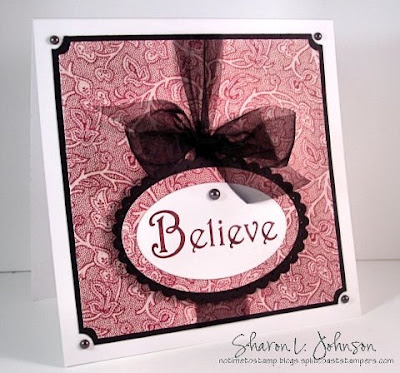
This card uses no images at all, just my Believe sentiment used as the focal point with a pretty black sheer bow! It’s a pretty card for the holidays, making use of DP for color and interest. This also is 5.5” square.
Stamps: Classic Harmony Oval Stamper II Ensemble
Paper: Black, White, Crafty Secrets Radiant Pad DP.
Ink: SU Baroque Burgundy Marker.
Accessories: Sheer Ribbon, Pearls, Ticket Corner Punch, Petite Oval Nestabilities, Mat Pack, Piercing Tool, Mounting Squares.
My next 3 cards are all 5.25” x 8”. I have a lot of envelopes to fit that size and it’s a great size for the holidays. It’s just large enough to allow you to insert photos and a letter easily. And all 3 of these cards can be considered recycled projects. To make each, I cut the main image from a Christmas card that we had received in years past. Talk about FUN, QUICK and EASY!!! OH, does THAT open up possibilities for a lot of quick card projects. Take a look.

I just HAD to use this darling Holstein cow image. Being dairy farmers, we make our living with Holstein cows so this will be a fun card to send out!!! I cut the image with the bag of toys out-of-the box. Santa was walking on grass, and that just DOESN’T do for us northerners (LOL!), so I put some white jumbo rickrack snow for him to walk on. My Believe was just stamped on white, ticket corner punched, smooshed in a Versa Mark Pad, then embossed with Iridescent Ice embossing powder - - SO pretty and sparkly!!! The tree is a punch and I drew the garland with a glitter pen and added the Twinkle Stickers. It’s a fun card!!!

Just wanted to show a closeup of the sparkly Believe panel and Twinkle Stickers on the tree.
Stamps: Classic Harmony Oval Stamper II Ensemble
Paper: SU Real Red, Black, White
Ink: Versa Fine Onyx Black, Versa Mark, Spica Glitter Pen by Copic
Accessories: Tree Punch by Emagination, Ticket Corner Punch, SU Iridescent Ice Embossing Powder, Twinkle Stickers by Amuse, Jumbo Rick Rack, Mounting Squares

The card I cut apart here contained this gorgeous drawing of Mary and Baby Jesus. It’s rather hard to see in the photo, but the image is embossed around the perimeter – so lovely IRL!!! Lesson learned on this card – I cut this image a couple years ago and had it in a box of images. I DID NOT have the card back, must have been tossed. BUT I surely could have used the card back to have an exact paper on which to stamp my Believe. I did pretty good matching it with this scrap I had in my scrap box, but it would have been so nice to have the entire card for an exact match. Moral of the story – save the entire card, not just the image!!! My Believe panel is elevated with mounting square – a simple card with a VERY powerful message!!
Stamps: Classic Harmony Oval Stamper II Ensemble
Paper: SU Riding Hood Red and Black, and scrap of neutral
Ink: Versa Fine Onyx Black
Accessories: Mounting Squares

The fun part on this card is that when I stamped the Believe, I left off the B and in place used a chipboard B – fun!!! That was easy to do as I colored my rubber with a SU marker. I also added a sparkly rhinestone in the star’s center, and honestly, that sparkly star is just mesmerizing IRL – wish you could see it – so pretty!!! I outlined the perimeter of my recycled image as well as my Very Vanilla mat with a gold Sharpie pen. Here it is before I adhered it all together.
 Can you see that my Believe is on the smaller of the Rectangle Stampers? Well, it’s for a reason. This stamp is in an oval set, but as you can see I have cut off the excess rubber. And just because it came in an oval set doesn’t mean you always need to use the oval stamper. As placement of the sentiment was important in this case, it was going to be a lot easier to get it straight if I stamped with a rectangle stamper rather than with an oval stamper. That’s the only reason – and it worked beautifully – got it stamped straight the first time!!! My chipboard B is mounted on foam squares. As for lining the image panel and Very Vanilla in gold, it’s really quite easy and fast. Whether you use a Sharpie with a bit finer tip or a wider tipped paint pen, the process is the same. Debbie Olson wrote a great little tutorial on edging with a paint pen, and that is exactly how I have done it for years. It works perfectly, every time. Check out Debbie’s tutorial here.
Stamps: Classic Harmony Oval Stamper II Ensemble, Harmony Rectangle Stamper Set
Paper: SU Very Vanilla, Always Artichoke
Ink: SU Always Artichoke Marker. Sharpie Gold Pen.
Accessories: K & Co. Chipboard, Rhinestone, Dimensionals.
And that wraps up this series of quick cards using only one sentiment stamp to create your card! Hope you give it a try!!! With the variety of sentiments available in not only the Classic Harmony Oval Stamper II Ensemble that I’ve used today, but all of the various JustRite sets, you will have plenty of inspiration to create away!!! Have fun!!!
Keep us in mind....."When it needs to be JustRite".


12 comments:
Oh wow Sharon!!!! I love each card you have created and what a terrific idea using past years cards. You certainly have done a great job and I know JustRite has to be extremely proud of you.
Joan
Sharon just fabulous!!! Love what you have done with this word...
Just when I think it can't get any better you go and out do what you did the day before, these cards are beautiful Sharon! My favorite is the Madonna, it's so peaceful and serene!
I love recycling greeting cards and you have done a fabulous outstanding job with them here. LOVE it! What an inspiration you are.
Fantastic, Sharon! Love how you have recycled your Christmas cards and great beautiful, new creations! Thanks for the inspiration!
These cards are all wonderful!! The Santa and cow really made me smile - too cute!
Sharon, you keep coming up with such great ideas! I love the idea of recycling but making it your own.
Your cards are wonderful I wondered where you got the holstien cow image before I read your whole post your recycling makes these cards even more special than the originals. Great idea. TFS Ann Lind
All these projects are marvelous, but I especially LOVE the last card with the star and little boy! So sweet!
WOWZERS !!!
They are ALL fabulous...gorgeous..wonderful !
wow... I'm in Awe!
These are all such incredibly wonderful cards, Sharon! Wow! I love the rick rack snow you created for your Santa and cow! The last card might be my favorite. Oh, my word, it's gorgeous!
All of your "Believe" cards are beautiful!! What a wonderful sampling of how versatile it can be!!
Post a Comment