Showing posts with label JustRite Christmas Ideas. Show all posts

Thursday, November 26, 2009

Happy Thanksgiving & Day 4 with Sankari Wegman

Happy Thanksgiving!! Today Sankari is sharing with us her placecards for Christmas Dinner.
What a fabulous idea to get a jump start on your Christmas Decor!! Don't forget that we are celebrating with a huge sale -20% off every item in our store (except the November Release). We have taken an additional 20% off all the items in the sale section of our store as well. Sale Ends November 30th!! Enjoy the Holiday and Shopping!
Good Morning Everyone!!!

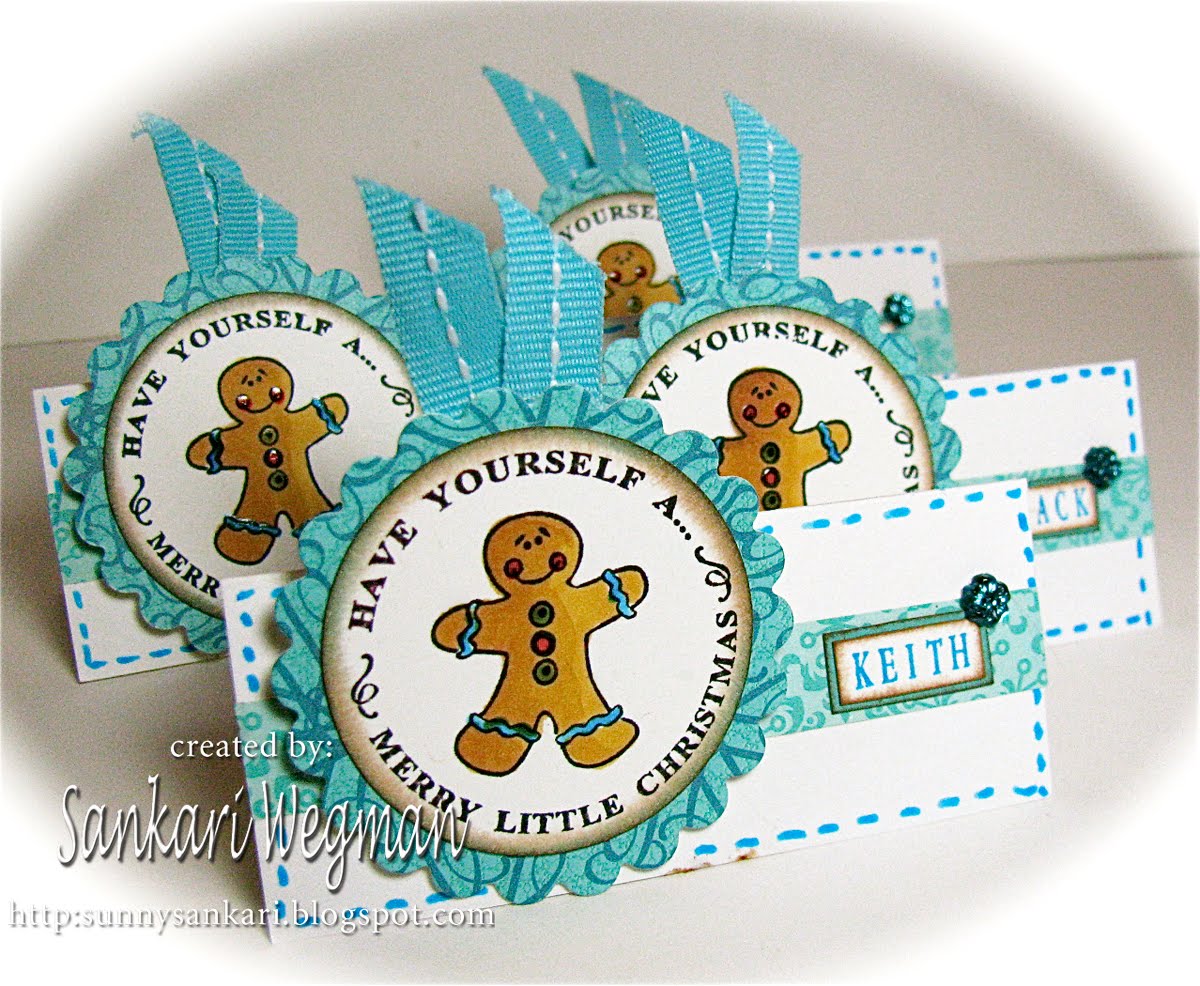
Happy Thanksgiving!!! Hope that you are all doing great and enjoying some time off to be with family and friends (and enjoy some yummy food!). Today, I am such a Just Rite project that I have been wanting to do for such a long time - to make handmade place settings for our Christmas dinner - but usually this is forgotten in the rush to buy gifts, attend the holiday parties at the kids schools etc. But this project is super easy to mass produce - here is a view of the 12 place cards that I made:

Each place card is 3"x 3 1/2" - scored at 1 1/2". I stamped three separate images and borders from the: Merry Little Christmas Borders and Centers Round 1 5/8" onto a piece of snow white cardstock from Taylored Expressions and then punched each one out with a 1 3/4" punch. I then cut out red, blue and green scallops with spellbinders and started the assembly line to put it together. Each place card has faux stitching and has everyone's names using the JustRite Wood Stamper 2" with Bonus 15pt Font & Center set. I stamped the names of the people that I know are definitely coming and made more placecards that do not yet have the names stamped because we are not yet sure who all is coming for dinner :) - but as soon as we do - then its a cinch to stamp their name to the place card.

Here is a view of the place cards with the circular stamp: Holiday Hugs and Kisses: Each of the hats were colored with copics and then white parts of the hat were sprinkled with some chunky glitter: Here is view of the place cards with the stamped sentiment: Have Yourself a Merry Little Christmas: I colored in the cute gingerbread men with copics and then went over it with some glaze pens:Here is a view of the place card with the stamped sentiment:Wishing you a Merry Christmas: The images are colored with copics and then covered with a glaze pen.
I loved making these Christmas dinner place cards and using these cute little Christmas stamps with the different bordered sentiments was such a nice way to create individual place settings that weren't all the same :) It was a cinch to make these place settings and I am excited to see everyone's face when they see their names in ink :) it's always a special time to sit down and have dinner with family - especially when everyone is scattered near and far! - so I wish for you a wonderful day today as we celebrate and give thanks!

Tomorrow, I have a wee little gift idea for special little bundles of joy!
So stop on buy for Day 5 project ideas tomorrow!!!
Big hugs!
Sankari :)


Keep us in mind....."When it needs to be JustRite".

Friday, November 20, 2009

JustRite Christmas Treat Wraps


Two fun new projects have just been added to the Featured Project Section of our website. These Christmas Treat Wraps are perfect for all the people on your Christmas List that you would like to give a little something special to. For complete downloadable instructions for these treat wraps visit the Featured Project Section of our website.

Keep us in mind....."When it needs to be JustRite".

Sunday, November 1, 2009

JustRite Snowflake Ornament- JustRite Featured Project

Do you have a ton of people on your list that you need to make a little gift for?? Today I am sharing pictures of one of 3 Snowflake Ornaments I designed for a recent class I was teaching in Texas. I am so excited to announce that you can find this project as part of a new section of our JustRite Website called "Featured Project". Click on over to the link where you will find a printable version of instructions. This ornament is a ton of fun to make, but you need to be prepared to wear glitter for a day or two.
Supplies:
JustRite Stampers: JB 08765 Old Fashioned Christmas, JB 08117 3 1/4" Wood Stamper
Spellbinders Nestabilities: Classic Scalloped Circle Large, Nested Poinsettia
Spellbinders Pendant Die: Fleur De Lis
Spellbinders™ Nestabilities
Darice 6 1/2" Glitter Snowflake
Art Institute Glitter:Crystal Ultrafine Transparent Glitter,Gala Glitz Blue
Copic Markers: 0,100, B000,B02,B16, C1,YR09,R89,E33,E17,G12,G21,Y17
INK: Memento Tuxedo Black, Ice blue Chalk Ink
Kaiser- Rhinestones
Helmar -V2 Vellum Spray- Helmar ,
Scotch Foam Mounting tape
Martha Stewart Glitter Glue

Keep us in mind....."When it needs to be JustRite".

Wednesday, September 23, 2009

Barb Schram Day Five - Personal Ornaments

A huge thank you to Barb for sharing her creativity with us over the past week and a half. Barb is on our design team and you can find tons of JustRite Projects on her blog every week. Tomorrow Angela will be sharing the first part of her calendar project with us.


Have you seen all the great cards that the CPS Design team has designed using our Christmas Stamps?? To see the first set of cards from the CPS Team visit here. For the second batch visit here. You still have time to play the challenge and as always their is a great JustRite Sponsorship Prize for one lucky winner.


Sharon Harnist has created this gorgeous scrapbook page for the sketch. For more details visit her blog post.


Personalizing Christmas Ornaments
I love taking a store bought item and placing my own personal twist on it! Today, I did just that, taking two holiday floral picks I purchased at Hobby Lobby (50 cents each at half price!) and making them into ornaments. Using floral picks enables me to use the wrapped wire as the ornament hanger after turning upside down, and no worries about how to get a hanger attached! I bent the pick wire and snipped off excess. This pink snowflake ornament adorns a tag stamped with Memento black ink, backed with scallop die cut silver paper. The sentiment image is from JustRite’s Something Sweet Set.

There are so many options to utilize when personalizing an ornament or any creation you make; and with all the JustRite products available, personalizing is a snap. For my ornaments today I used JustRite’s Times New Roman font, JustRite’s Tiny Little Words Set, and JustRite’s Something Sweet Set.
When adding a cardstock paper strip around an ornament such as this, I make sure the ornament is plastic or styrofoam material. That allows for the cardstock and punched embellishments to be attached using straight pins. No need for adhesives! Gotta love that! After stamping the word Sharon and 2009, I cut out using a word window punch. At the one end of the date paper piece, I punched a hole so the date piece could easily thread onto the wire hanger. The punched Martha Stewart snowflakes and border strips are held in place with white pearl head straight pins.
I made this ornament for my cousin. So, it is fitting that I chose to stamp “Made with Love” from JustRite’s Tiny Words Set. After punching it out I attached using small silver head pins. (the kind that are from my husbands new dress shirts!) A bow around the wire and glittered snowflakes make this a simple, doable, and easy on the budget ornament!

After punching out my snowflakes I dabbed a little glue with my Quickie Glue pen and sprinkled with Palette Ultrafine Prisma glitter. On the silver and pink ornament, you see the white mini plastic snowflakes; I punched them using my Crop-a-dile. So, it was not a problem sticking the straight pin through, attaching to the ornament.

My game plan is to make ornaments for my husband’s siblings and their children, using their last name. For example, The Schram Family, or The Schrams or any name, sentiment, colored image for these Christmas ornaments would work! And all from floral picks, who knew! I hope you let your imagination see the possibilities JustRite stamps have waiting for you as the upcoming holiday season approaches!

Sending a warm and heartfelt THANK YOU to JustRite for allowing me to share some of my JustRite creations while being here as your guest blogger. It has been such a great time of sharing and I so appreciate you having me! Take good care!


Stamps: JustRite Times New Roman font, Something Sweet Set, Tiny Little Words Set
Ink: Memento Tuxedo Black, Adirondack Currant
Paper: Papertreyink cardstock, Basic Grey DP
Accessories: Sharon Johnson and Michaels ribbon, MS snowflake and border punches, decorative straight pins, floral picks, circle punches, spellbinder circle and scallop dies, quickie glue pen, glitter, crop-a-dile, snowflake plastic embellishments


Keep us in mind....."When it needs to be JustRite".

Friday, August 28, 2009

Stampers Dream Christmas Sneak Peek Week- Day Five

A huge thanks to all the fabulous designers from the Stamper's Dream Team. Thank you for sharing your wonderful JustRite Christmas Projects with us!! We have certainly been more than inspired!

Today the Stamper's Dream Team has a great array of Christmas Projects Today!!
First Michelle has a great Candy Bar Wrapper designed using the Something Sweet Set- these would be perfect for Secret Santa Gifts.
Then Carolyn King has 2 great Treats. A Sweet little Snowman gift box

and a Wonderful Snowman Christmas Ornament using the Old Fashioned Christmas Stamp Set.

Then Kimberly Crawford- has designed a Shabby Chic Christmas Card using the A Merry Little Christmas Set.
And then Amy Sheffer had designed this simply exquisite card using the Christmas Joy Borders and Centers.
Stop back in tomorrow!! We have a special treat for YOU!!

Keep us in mind....."When it needs to be JustRite".

Tuesday, August 25, 2009

Stampers Dream Christmas Sneak Peeks - Day Two

Wow!! The dream team has some more really Sweet Holiday Treats for you today.


Michelle has designed the Sweetest Custom Treat Jar that you won't want to miss!! Using a combination of JustRite Products.


Next you will want to visit Amy Sheffer's Blog to see what this image from the Have A Merry Christmas is the center for!! Be prepared to pick your jaw up off the floor because it is GORGEOUS!! You will definitely want to case this project!!

Then you will need to visit Charmaine's post to see how she has used the Christmas Treasure set to design a great gift.

You will absolutley love all the exquisite details in this Christmas Card by Laurie Schmidlin.
Stop back in tomorrow to see what the Dream Team has created for Day 3!!


Keep us in mind....."When it needs to be JustRite".

Monday, August 24, 2009

Stampers Dream Christmas Sneak Peek Week- Day One

Good morning - this week on the JustRite Blog we are featuring Christmas Sneak Peeks from Stamper's Dream. So grab your cup of coffee or your favorite caffeine and sit back and relax as you visit the blogs of the Stamper's Dream Team.

Our First Sneak Peek comes from Michelle the owner of Stamper's Dream. Michelle has created a fun tag using the Christmas Joy Borders and Centers set. All our oval designs now come with images designed in both vertical and horizontal configurations, which gives you lots of creative options for using our images.
So click through to Michelle's Blog post.

Next stop by to see how Tosha's Blog post to see all the details on how she created a fun ornament for your tree using the Something Sweet Designer Centers and Borders.
This would be a great package topper!! 2 gifts in one!! Thanks for the great idea Tosha!!
Next you'll find a exquisite card designed by Denise using the Christmas Treasure set.


You'll just love all the details in the layers of Denise's Christmas card featuring our Red Cardinal.

Then stop by Kimberly's Blog to see her fun Christmas Cocoa Ensemble complete with coasters

and a fun gift tag for a mug. A special thanks to the Stamper's Dream Team for today's Christmas Inspiration today!!

Keep us in mind....."When it needs to be JustRite".

Saturday, August 22, 2009

Christmas- Day 5 with Michele Kovack

A huge thank you to Michele for all the fabulous Christmas Inspiration!!! Are you humming Christmas jingles yet?? We have tons more Christmas Projects to share with you next week because starting on Monday we have a full week of Christmas Sneak Peeks from the Stampers Dream Team!! I don't know about you but I can't wait to see what Michelle Rodger's Dream Team does with our new Chrismas Stamp designs. Have you pulled out your Christmas supplies yet??? Wouldn't it be fun to make your Christmas cards and gifts early...so you can enjoy the Holidays this year!!

We also have more exciting news to share with you - Michele Kovak is now selling her beautiful creations. You can find Michele's Shabby Chic Projects for sale ( remember they are one of a kind) in her new little online shop called Art A La Carte which is a small shop within Lollishops. (the frou frou friendly marketplace). If you haven't ever been to this site and you love Shabby Chic Creations you are in for a real treat. The site is similar to etsy but is dedicated to shops selling finshed Shabby Chic projects, vintage treasures and artistic elements. Michele finishes her week of guest blogging with a bang!! With this fun snowman ensemble!! Here's Michelle.


I created a little gift box and card combo using JustRite's Old Fashioned Christmas set. I loved this big ole snowman! I colored him in with my Copics. I used white flock for his hat and scarf. The outer border was stamped on separate paper.

The images were cut using Spellbinder's circles. The paper I used was October Afternoon.
The box was actually a box that a new power adapter came in for my daughter's communication device. (You probably have noticed by now that I do not throw ANYTHING away....a sickness....really.....) After wrapping the paper around the box, I tied it shut with a pretty satin bow and button. It can be filled with candies or cookies......: )
I have so enjoyed being guest blogger this week! It is an honor to design for such a fantastic company! And to everyone who visited me this week......THANK YOU!!!!
Michele - Thanks for spending the week with us sharing your vintage style!! Be sure to stop back in all week!! As we have more Christmas Inspiration all week long!!
Keep us in mind....."When it needs to be JustRite".

Friday, August 21, 2009

Christmas -Day 4 with Michele Kovack

Today I thought I would start out today's post with a shout out for a couple of fun things going on in the blog world. First, did you see who the featured designer was on Wednesday on Papercrafts Moxie Fab World Blog?? None other than the fabulous Debbie Olson. I highly recommend following the link to read the interview with Debbie. You can find out what inspires one of our talented design team members and you also have a chance to win some Fab blog candy- (you have til Sunday to enter to win Debbie's blog candy on the Moxie Fab World blog).

For those of you who just love Shabby Chic and Michele's fun projects, you can get inspiration daily from Michele on her blog - Thoughts of a Cardmaking Scrapbooker. Michele will also be teaching her first on-line stamping classes next week. For all the details visit here.
Note she has changed the dates and the classes begin on August 24th and run through the 28th.

Today Michele has a fun box for Christmas Cookies to share with you. Here's Michele:

Once again, I am trying to think of thoughtful, inexpensive gifts to give this year. I thought what better way then to give some home baked cookies to a teacher, neighbor, or mailman?
I picked up this cute window box at a Wilton tent sale I attended this summer. It is by Martha Stewart.
I used Basic Grey paper for the top and sides. I measured the size of the "window" and cut that out of my DP.I distressed the edges with Tim Holtz distress Ink. I didn't want to cover the window completely so the cookies could peek through, but I did want to dress it up a bit.
I used JustRite's Something Sweet set. I stamped and colored the cookies in with Copics and used a white Souffle pen to give the white icing a bit of dimension. I stamped the sentiment in red on a separate piece of card stock. Using my Circular Nesties, I cut out all the circles and layered them over my glittered snowflake and doily.
I wanted the recipient to take the decoration off easily (to get to those cookies! : ), so I tied some bakers twine around box and through layered images. Now all one needs to do is slip off the decoration and get to eating those cookies!
Thanks Michele for keeping the Christmas Mojo going here on the JustRite Blog!!
Keep us in mind....."When it needs to be JustRite".

Thursday, August 20, 2009

Christmas Day Three with Michele Kovack

Congratulations to Cazzy you are the winner of our blog candy from the JustRite Christmas Blog Hop -the Holiday Demi Phrases, Have a Merry Little Christmas and the 2" stamper with 15 point font!! Cazzy please send your full name and shipping information to kellief@justritestampers.com

Random Integer Generator
Here are your random numbers:164
Timestamp: 2009-08-20 12:02:51 UTC

Cazzy said...
I love all the sets but top of my wish list is Something Sweet! The cocoa mug on Sharon's blog did it for me!Cazzy x

You can now find all the projects from the blog hop uploaded into our facebook photo albums by stamp set. The facebook photo albums are a great resource for JustRite Inspiration as we have over 24 albums chalked full of projects. Simply decide which JustRite set you want to play with and then select the photo album for that set. You can instantly see all the wonderful designs our design team has created using the set you already own... or perhaps the set that you are gonna really ..really need. You do not have to have a facebook account to view our facebook page.

Just a reminder that our Witch Way to the Treats is a limited edition and will be sold out long before Halloween. So if it is on your current wishlist - I would recommend purchasing it before you regret not owning it.

We are also currently out of stock in our JB 08119 Large Oval Stamper (the block you need for the Thinking of you set and the Autumn Blessing Set). We are so excited that you love our new designs and that we are selling them as fast as they arrive in the warehouse. Don't worry we have lots more on order and we are still taking orders for the block . I just wanted everyone to know we are currently back ordering the wooden stampers. Our next shipment of Large Oval Wooden Stampers arrives the 2nd week of September. We will ship in the order that orders are received -place your orders today to be at the top of the wait list.

If you have the 3 1/4" stamper on your wish list we still have a great deal for you. You can purchase the JB 08140 Harmony Classic Circle III Stamp Ensemble for just $10.00 the set originally sold for $19.95 and comes with the 3 1/4" stamper and 6 designer centers and borders. By ordering this set instead of JB 08117. You can save $.95 cents and all the stamps in the set are free!! Can't beat a deal like that!!

A special thanks to Michele for guest blogging for us this week!! She has another great Christmas Project to share with you today.

Here's Michele: With Christmas right around the corner, I thought a planner would be great way to keep track of people I have to buy for. I like to write down gift ideas for people.

When I actually purchase the gift, I like to know what I bought, how much was spent, and a place for the receipt. I picked up this notebook in the dollar section at Michaels......gotta love that dollar section! : ) Since some of the colors were bright on the edge, I thought I would go with that.....and grabbed some SU! paper that had the oranges, browns, blues, and orange in it.
Not traditional Christmas colors, but I kind of love that! I covered the front and back of the notebook using Modge Podge. Then I used JustRite's Something Sweet set. I stamped the sentiment and border separately and used various Nesties for the circles and scallops. Layer everything. I added a white ribbon, beaded snowflake, and used my 15 point Times Roman Font which comes with the 2" stamper and then added some hardware. When you open the planner there is an envelope in the front for receipts.

I created my next custom sentiment using 25 point Times New Roman lower case (the P is Times New Roman Upper case) and the Horizontal Stamper.

Thanks Michele for another great Christmas Idea...we can't wait to see what you have to share with us tomorrow. Be sure to leave Michele a comment!!

Keep us in mind....."When it needs to be JustRite".

Wednesday, August 19, 2009

Christmas -Day Two with Michele Kovack

Just a reminder that we still have active Blog Candy from The JustRite Christmas Blog Hop which is open until Midnight August 19th. For all the details go to the Blog Hop..You will find the blog candy details at the bottom of this post. Goodluck to everyone.

Reading your comments has been so great ..... you don't even know how great it is to hear your comments!!! Sometimes it is a little lonely being a blogger. Imagine thousands of people coming to visit you ...but everyone just comes to the door and peeks in but no one decides to open the door and come in to visit!! So thanks for coming into our studios,sitting and chatting with us!! We so appreciate it when you leave a comment!! Thanks to everyone who took the time to leave comments on all our blogs!! We are definitely feeling the love this week!

Here's Michele:
I created a couple of little candy canisters for Christmas. Being a teacher, I am always looking for little, inexpensive, but thoughtful gifts to give fellow teachers, aides, bus drivers etc. I found these blue canisters at Michaels in the dollar bins. I decided to work with the blue in them by using paper from Basic Grey. I simply used my scalloped border punch then adhered the paper to the canister. For the top, I used my circle Nestibilities. The image and sentiment are from the JB 08775 Something Sweet stamp set.



The snowman was colored in using Copics and then cut him out. The sentiment was stamped on a separate piece of paper, cut out with a circular Nestie. Then I placed a smaller round Nestie in the center so when I airbrushed I was left with a white rim. I placed the snowman in the center with a pop dot. I added white Flower Soft to the "ground" to act as the snow.


To dress up the canisters I added a pretty satin bow and then a "sugared" snowflake. I did this by cutting the snowflake with my Spellbinder's snowflake die, coated it with glue and added Diamond Dust. This is a very chunky glitter with lots of sparkle. To add a bit of color, I sprayed it with Glimmer Mist. After it was dry, I tied it to my satin bow. Now, just add some pretty Christmas candy, and you've got a great little gift!

Stop back tomorrow to see Michele's next Christmas Project.

Keep us in mind....."When it needs to be JustRite".