Showing posts with label JustRite Home Decor. Show all posts

Thursday, October 29, 2009

JustRite Day 4 with Sharon Harnist – November Calendar

10-4-CardinalNovCalSH If you are a frequent visitor to my blog, you’ll know how much I love making a monthly calendar (the link above is to my previous calendars). This page is 6-inches square and is displayed in a wooden stand on my desk. When I’m feeling industrious, I’ll go ahead and make a matching 6-inch scrap page in about the same format and put a favorite photo from the month on it. Then at the end of the year I already have a brag book all made up for a keepsake of the year! So even if you don’t have a need for a calendar, keep in mind this page could easily be reproduced as a scrapbook page just by omitting the calendar area and replacing it with a photo.

You can imagine how thrilled I was when JustRite came out with a wonderful Calendar Set in a beautiful font this year! Of course it’s perfect for my calendars AND for scrapbook page titles … and how about greeting cards – the monthly titles would work great for those, too!

10-4-CardinalNovCloseSH

Here, I stamped “November” right on my computer-generated calendar. The beautiful cardinal image is from JustRite’s Christmas Treasures 3-1/4” round set (who says a “Christmas image" can’t also be used for another time of the year)?!! What is great about JustRite’s products is that you are not limited to a certain shape. You have the ability to use the border, or not, the center image by itself – it’s your choice! Here, I definitely didn’t have the space for a 3-1/4” image on my calendar and it would have overpowered the rest of the design. So I chose to just use the center image.

10-4CardinalStampJigSHYou are also not limited to using the 3-1/4” round stamper shown above that this cardinal image would normally fit on. If, for example, you’d like to use the image with a stamp positioner, that’s hard to do with a round stamper. But the image fits perfectly onto the Horizontal Wood (Rectangle) Stamper which CAN be used with a stamp positioner! Or if you’d like to add a custom sentiment or monogram there on the Rectangle Stamper along with the cardinal image, you could do that, too. The possibilities and combinations are endless with JustRite’s innovative interchangeable products!

After stamping the image, I colored it with these Copic markers:

10-4-CardinalCopicCalSH

After coloring, I die cut the image with Spellbinders Labels One die and airbrushed the background (with BG13) while the image was still in the die – that’s what gives the nice crisp white border around the edge of the die cut.

Some machine stitching around the edge of the page, buttons & ribbon complete my calendar. Can you believe November is just around the corner?!!

I’ll be back tomorrow with my final project of the week … hint: you just might get to see a sneak peek of a new product that will be debuting next week!

Supplies --
Stamps: JustRite Calendar Set & Christmas Treasures
Paper: Stampin’ Up Vanilla, Neenah Natural White, Cosmo Cricket Early Bird Mini Deck
Ink: Stampin’ Up Ruby Red dye ink, Memento Rich Cocoa, Copic markers
Accessories: Spellbinders Labels One die set, downloadable computer-generated calendar, EK Success corner rounder, Martha Stewart Loopy border punch, Papertrey Ink buttons, ribbon & twine, Bow Easy, foam tape, sewing machine

Wednesday, October 28, 2009

Day 3 with Sharon Harnist – Family Bingo

10-3-BingoFamilySH

Today I have a scrappy home decor project to share with you that can easily be customized for whatever season, holiday, or celebration you wish since it uses JustRite’s fonts!  The base of this 6.25” x 7.25” plaque was a $1 find at Hobby Lobby.  I decoupaged it with some of my favorite dark red BasicGrey paper.

10-3-BingoFamilySneakSH 

I love the trendy look of Bingo cards in just about any area of crafting these days – altered art, card making, and scrapbooking. This Bingo card is a download I created specifically to accommodate JustRite’s fonts! 

A little info about these Bingo cards: I have used the largest brown card here (4.25” x 5.50”) which accepts JustRite’s 95-point font perfectly.  (There is also a smaller 3” x 3.50” size that fits the 50-point fonts and both card sizes are available in either brown or black ink to print from your computer).  The cards are available either with numbers or blank, so you can even customize them with JustRite’s numbers that come in all of the font sets!  Now you’ll never be limited to a certain color or pre-printed word on your Bingo cards!

I printed my Bingo card on light weight (about 65-80 lb.) vanilla cardstock.  Here, you can see how easy it is to place the Horizontal Wood Stamper at the top of the card and use the card as a guide for your letter spacing:

10-3-BingoFontSH

I used my favorite Brayton 95-point font and stamped it with Memento Rhubarb Stalk ink.  And since each of JustRite’s font sets contain three different sizes (95, 50, and 25-point), alpha letters as well as numbers, you’ll be all set to make any size of customized Bingo cards, titles for scrapbook pages, or sentiments for your cards or home decor!

You could also make this project with the word “Thanks” on the Bingo card and maybe a snapshot of the family that is hosting any of your holiday celebrations … what a wonderful hostess gift for them that won’t soon be forgotten!  I can also see this project created for a sweet new baby – what a priceless treasure for his/her parents!

A few more details about my project:  After I stamped the word “Family” on my card, I crumpled it up and then flattened it back out, distressed the edges, and then aged the card with Antique Linen distress ink.  I glittered the plain adhesive chipboard pieces on the sticky backing with Martha Stewart garnet glitter and then just used foam tape and glue dots to adhere them to the card. 

10-3-BingoFamilyCloseFSH

The Prima flower started out white – I stamped the text onto it with red ink and then distressed it with Antique Linen ink.  I also gave the scalloped plaque base a protective coating of decoupage glue on the top of the paper.  The photo of my sweet family was printed in sepia tones and now I can hang them close by and keep an eye on them at all times!

You are certainly welcome to download and print out these Bingo cards (here) for your personal crafting and if you do, we would love to see your creations with them, so please leave a link for us in the comments on this post!

Supplies --
Stamps: JustRite Brayton Uppercase font (95-point) + Horizontal Wood Stamper, CHF Vintage Text Scrapblock
Paper: BasicGrey Wassail-Cranberry Sauce, Stampin’ Up Vanilla
Ink: Memento Rhubarb Stalk, Ranger Antique Linen Distress Ink
Accessories: Downloadable Bingo card from PaperFections, plaque from Hobby Lobby, Papertrey Ink buttons & twine, American Crafts Thickers chipboard, Martha Stewart garnet glitter, Prima flowers, Maya Road pom-pom trim, May Arts ribbon, Tonic Paper Distresser, ModPodge, foam tape

Keep us in mind....."When it needs to be JustRite".

Wednesday, November 26, 2008

Day Three with Julie Buhler

Today Julie has a wonderful idea for sprucing up your guest bathroom with this Sweet Bathroom Ensemble...it'll make your guest feel like they are at a Spa.

The holiday season is also a time for guests. We all have company, but some of us have family or friends that travel fair distances to enjoy our wit and charm. The bonus with this next project is that it can be suited for anytime of the year that you entertain overnight guests.

Everything I got in the basket, ribbon and tissue included was under $10! This is an inexpensive way to greet your family. When I pack, I know I usually only bring the essentials. My basket includes the little extras to make their stay a bit more special. But, that's not all, it is totally redecorated so they can tell you have put some thought into it. You can change the patterned paper and colors for specific seasons, or specific guests.

I used the 2 5/16 Harmony Classic Circle Stamper II to design the words using the Brayton font. I then used my punches to make the medallions to go on each bottle. I wrapped the bottles in patterned paper and solid CS, before adhering the contents indicators (the technical term for words stamped on CS...hehehe). I know, you are thinking, how well will that hold up in the shower?


It won't, that is why I designed it to come off ! So, you can keep them, or if something comes up and you need to switch the colors, go ahead! You can take the papers off to refill the bottles, too, so that you won't spill on your creations. It is an easy and thrifty way to decorate your bathroom, but beautiful all the same!

JustRite Stampers: Harmony Classic Circle Stamper II, Brayton Font
Punches: Oval and Circle Punch - Stampin' UP

Keep us in mind....."When it needs to be JustRite".

Thursday, October 23, 2008

Day Four with Lisa Somerville- Door Plaque

Today is the last day to vote in the Pre-Inked Stamping Contest. You may vote for your favorite card in the pre-inked stamping contest by clicking here. You may vote for your favorite project in the pre-inked stamping contest by clicking here. Voting will be open until 8 pm EST Thursday Oct 23rd. Vote by leaving a comment on each post. The Grand prize winners will be announce on Friday.


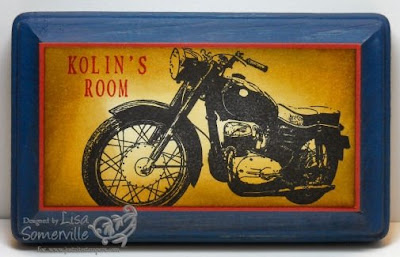
Welcome to Day 4 with Lisa Somerville. Today Lisa show's us how to design a personalized door plaque.The JustRite Stampers Font Sets and Stamper Sets make personalizing your projects a snap! I love the new Rectangular Stamper Set, it's perfect for adding your own sentiments to your projects, or personalizing projects like I've done here!


I picked up the wood plaque at my Michaels store, painted it with Gesso and let it dry. I then used my Adirondack Acrylic Paint Dabber in Denim to add color, and let it dry. Before I stamped my image for my project, I placed my Times New Roman Font - size 25 onto my Harmony Rectangular Stamper Set. Then I inked it with Riding Hood Red using my Stamp-a-ma-jig, I stamped it on my image sheet so that I could use it for proper placement later in my project.
I stamped my image (Artistic Outpost - Route 66 Plate) in Black on vanilla card stock, let dry. I inked the sentiment I created earlier in Riding Hood Red, and using my Stamp-a-ma-Jig,
stamped it onto my card stock as shown.


Using my Distress Inks, Craft Sheet and Blending Tool, I applied the Straw ink, completely covering my project, then used the Corduroy around the edge, and finished with Black Soot. I adhered my image to a piece of Riding Hood Red card stock, then to my plaque using Tombow Multi Glue.

Once dry, I've created a great door plaque - perfect for gift giving!

Supplies:
JustRite Stamps - Times New Roman Font Set, Harmony Rectangular Stamper Set,

Stamps -Artistic Outpost Route 66
Ink - Ranger Black Archival, Ranger Distress Inks - Straw, Brushed Corduroy, Black, Stampin' Up! Riding Hood Red
Card Stock - Vanilla, Riding Hood Red
Accessories - Craft Mat, Ink Blending Tool, Stamp-a-ma-jig, Adirondack Acrylic Paint Dabber - Denim, Wood Plaque - Michaels, Gesso, Sponge Applicator, Tombow Multi


Keep us in mind....."When it needs to be JustRite".

Friday, October 3, 2008

Inspiration Friday - Autumn Welcome Coronet- Double Tutorial

It's our final day with our guest blogger Keri Lee Sereika and she has a dynamite project for us with a double tutorial for Inspiration Friday. Keri thanks for a fabulous week and a great double Tutorial.

Today I thought it would be fun to show how you can use JustRite Stampers Font Sets to create beautiful home decor. Here I have created a floral arrangement that could be adapted to any season and you could put any greeting on the plaque on front. I also decided to create a tutorial for this project! The first part of this tutorial shows how to use a Stamp-a-ma-jig with the JustRite stamps. The second part of the tutorial shows how to create the paper coronet to hold the flowers. I hope you enjoy!


Begin by stamping "WELCOM" using the Trompe Font Set and the Harmony Rectangular Stamper Set inked with Chestnut Roan Fluid Chalk Ink.

Next, remove the "E" from the Rectangular Stamper and place it in a smaller handle. Here I chose the Wood Handle that came with one of my Border Starter Sets. Take your Stamp-a-ma-jig and lay down the plastic imaging sheet in the corner of the Stamp-a-ma-jig. Ink your stamp and stamp the "E" onto the imagin sheet. TAKE NOTE OF WHICH WAY YOUR HANDLE IS...when you go to stamp again you want to be sure your handle is facing the same direction. See how I have my "JustRite" upside down? It will be that way the next time I stamp my "E" as well. (Note: You could use any of the JustRite Stampers Wood Handles and follow these same steps)
Next, remove the imaging sheet from the Stamp-a-ma-jig and place it over the "WELCOM" you have already stamped. Make sure it is lined up just as you would like it to show up on your final project.
Replace the Stamp-a-ma-jig snugly against the imaging sheet and remove the imaging sheet.

Pressing the Stamp-a-ma-jig handle firmly down onto your project, reink your "E" image and line up the "JustRite" on the back of the handle, place the handle against the inside corner of the Stamp-a-ma-jig and press your image onto your project.

Pulling STRAIGHT UP and lift the stamp away from your project to reveal your perfectly spaced "WELCOME". (WHEW that was the hard part of the tutorial...give yourself a pat on the back! You did it!)

Using Curvy Rectangles Die by Spellbinders, Die cut your plaque. If you don't have a die cut system you could certainly just cut your plaque into a rectangle, or you could dress up the edges of the rectangle with a punch, or deco scissors if you own those!

Using a Jumbo Sponge Dauber, sponged the edges of the plaque using Burnt Sienna Fluid Chalk Ink by Clearsnap. Go lightly over the entire surface and then apply additional layers to the outside edge for real depth and color.
Apply a few layers of Chestnut Roan Fluid Chalk Ink by Clearsnap to the outside edges of the plaque to just add to the depth you started in step eight.

Using Dark Brown Fluid Chalk Ink by Clearsnap, Stamp a wingding in each corner. If you are not sure where your image will end up and want to use the Stamp-a-ma-jig simply follow steps two through six for perfect placement...I thought of that AFTER I did mine...otherwise I may have had more even results! LOL Go figure!
Take your copper craft wire and begin to wrap it around the handle of a paint brush or other small round stick or handle. A bamboo skewer works well for this too, or a pencil also!
Once you have a nice sized length of coil (1 1/2 - 2 inches in length) snip the coil. Stretch it out just a bit and poke a hole in the top two corners of your plaque and slip just a bit of the coil through each hole and recoil it on the other side tightly. You will no have a handle on your plaque that you can adhere to your paper coronet. Read on for step by step directions how to make the paper coronet!
Select your paper and place it face up on your work table. Orient the paper so that you have your pattern going in the direction you want it to be in on the final product.

Flip the paper right to left (just as if you were reading a book) to make sure you have the paper oriented the way you want. Take up the two bottom corners of your paper and lay the right corner over the left corner.
Continue to overlap the corners, feeding them evenly within one another to form a cone.

Continue until you have a tall thin cone that the top two corners nearly line up at the top. I was not ever able to get it perfect but it is ok because it does not show once the floral arrangment is in the cone anyway! LOL
This is what the front view of the coronet looks like at this point. You want to check the front to be sure you like the look of it before proceeding to the next step.
Once you are sure you like how the front looks, make sure your points are almost even. If you are happy with the front and the top points it is not time to adhere your paper to itself to secure the cone. Place a few small pieces of tape inside the cone on the seam to hold it in place from the inside. While holding the top of the cone tight, but not crushing it, let the outside bottom unroll just a bit and place a good strong adhesive to the edges of the triangular piece that unrolls. I first used Monoadhesive, this is not strong enough. I would suggest a good glue like Beacon zip Dry Paper Glue, or a good red line tape for good strong hold.

Now that you have your cone we turn to the floral arrangment. I purchase a foam cone so I could actually stick my stems in and arrange them. However, you could simply stick stems into the paper coronet and save the $$ spent on the foam cone if you wish.
I arranged two one dollar floral picks from my Dollar Tree store and added four pieces of dry eucalyptus springs I had on hand...this is a VERY inexpensive project but no one would ever guess!!!To decorate the outside of the cone I punched a strip of Blush Red Light Prismatics cardstock using the new Treading Water Border punch by Fiskars and adhered it to the cone. Because the cone is not cylindrical I had to allow it to go up slightly in the back to keep it flush on the front...but that is ok because no one sees the back anyway!


Using hot glue adhere a small loop of ribbon to the back of the coronet. Be sure to adhere it directly to the back of the project and not just the strip of paper you just added to the proejct...again I found out after the fact that it needed to be WELL ADHERED to the coronet itself....it fell off my wall because I had only adhered it to the strip...

Flip the coronet over and place a glob of hot glue to the front top about an inch from the edge. Place the wire handle of your plaque into the glob and hold until cool.
Tie a small ribbon bow and adhere to hide the hot glue glob. Place your flowers or floral arrangement into the now finished coronet to complete your project.
Supplies:
Inks: Chestnut Roan, Burnt Sienna, Dark Brown Fluid Chalk Inks
Cardstock: Clearsnap -Blush Red Light Prismatics & Natural Smooth - Prism Papers
Patterned Paper: K & Company
Accessories:Curvy Rectangle Die - Spellbinders, Punch: Treading Water Border Punch - Fiskars, Copper Craft Wire, Ribbon, Flowers and Foam Cone


Keep us in mind....."When it needs to be JustRite".

Friday, September 5, 2008

Fireman Andy

We are sad to see Joan's final day as guest blogger. It has been a great week filled with lots of creativity and Joan has impressed us all. Thanks to everyone for leaving her lots of comments and encouragement throughout the week. Thank you Joan and we wish you much luck and success on your design team endeavors.

Today is my final day as guest blogger for JustRite Stamps. A huge thanks to Denise for extending this invitation to me. I still haven’t made any monogrammed cards because I’ve had too much fun using the Small Letter Stamps. However, I see lots of sets of cards coming for Christmas gifts. In the meantime, please enjoy looking at my “baby!”


Like all Moms, I have a million pictures of my son, but they are boxed and out of sight. I have always loved this picture of my son, Andy (come on, is he cute or what!!??). I decided to show off this picture by decorating a frame and embellishing it with the JustRite stamper. Andy was 3 when I took this picture on Halloween. I remember that he and his Dad went to a grand total of ONE house, when Andy got scared, started crying and came home. ONE stinkin’ candy bar!

As I write this post, Andy is 17 and sitting next to me on his computer laughing at some Manga comics. What a privilege to be a Mom. Ok, before I start crying and telling you every single thing about my kid, let’s move on to the frame and the JustRite Stamps!

I used a “Create-A-Frame” from Savage Paper and covered the both mats with papers from the Hallowhimsy line from Imaginisce. I’ve never covered a frame before, and of course you have to cut out a hole for the picture — in this case 4x6. Here’s my first tip: Cut the paper with your dreaded Exacto Knife BEFORE you glue it to the mat. I know this is stating the obvious, but I didn’t know this about 2 hours ago! Second tip: buy extra papers (enough said on that subject...). Third tip: this is the kind of frame where you put the picture inside and then glue back on. Once the picture is in, it is in. I decided that my original photo was not JustRite Blog worthy, so I ripped the frame apart (while holding my breath) and put in the better photo. Don’t do that!

The rest is self-explanatory. OH OH OH, I almost forgot. Notice how the photo is black and white with a shadowy background? Photoshop. Debbie Olson posted about “visual noise” the other day and the color picture of Andy fought the patterned paper. Click of the mouse and I put a stop to that racket.


Now doesn’t the JustRite embellishment make this whole frame rock? Personalization baby!!! If I had the time, I swear I’d take orders and make these and make a bundle (assuming I master the Exacto knife.....). Think wedding, engagements, babies, school pictures, etc. LOVE that Small Letter set.

Thanks for sticking with me this week. I can’t wait to see what the next JustRite blogger has created.

Keep us in mind....."When it needs to be JustRite".

Supplies not already mentioned: Stampin Up! Black Cardstock and Marker, Chipboard, Jersey Ribbons, and brads. Spellbinders Nestability Circle and Scallop Circle dies; Paper Shaper Photo Corner Punch, and EK Success 1 and 1/4” circle punch.

Friday, June 20, 2008

Altered Art

It has been a pleasure working with Dawn and we are so thankful that she shared her creativity with us all week. We hope you enjoyed these projects and will continue to visit Dawn at her blog Dawn's Stampin Thoughts which has been added to our blogroll to the right. Monogramming isn't limited to just card making. With this stamper you have the ability to load it up with different size letters allowing you to personalize with more than just a monogram. There is enough room to spell out names or short words.

My best friend Diane gave me these coasters a while ago and I am sad to say I don't even now if they are still available at Hallmark. As soon as I saw the Monogram Stamper I knew I had to alter these coasters. How perfect to make every day items personalized for your family & friends? You can personalize gifts for weddings, anniversaries and birthdays. These particular coasters are for me and will be used in my home.

This was actually the first project I made with the Monogram Stamper and I knew right from the first name I stamped that I was in LOVE with JustRite. The Monogram Stamper is so easy to work with and I LOVE that I have the ability to create my own sayings/greetings/sentiments. Total creative freedom!


I used a Cuttlebug embossing folder for my background & keeping with the black and white theme for the coasters I printed out the photos in black and white wallet size. The size of the coaster area for scrapping was a 3 1/4 X 3 1/4 and the monogram stamper works perfectly weather you use punches or the Coluzzle Cutting System for whatever size project you are making. I used the Stampin Up! 1 1/4" Circle and the 1 3/8 circle punch for our names in the coasters.

The best part of this project is not only can I use these as drink coasters but they will also look fabulous displayed on my shelf too.

Thanks for stopping by and happy monograming !
Dawn Griffith
JustRite Guest Blog Designer