Showing posts with label JustRite Gift Ideas. Show all posts

Thursday, November 12, 2009

Day 4 with Kathy Jones - Sprinkled with Love

First I would like to answer a few questions from yesterday's post. Kathy lives in Australia and in Australia hardware stores carry Kaiser Kraft Products. Many of you thought this would be a great idea -since all our Hubby's wouldn't mind a trip to the hardware store right? Also in Aussie lingo a basket is called a hamper.

You can begin shopping for the November Release tomorrow -- be sure to stop in tomorrow because we have a big announcement you won't want to miss!!

Do you have a little princess on your Christmas List?? Kathy has designed the sweetest Fairy ensemble for her daughter today, it would be such a fun gift for any little girl on your list.

Hello everyone and welcome to Day 4 of my Guest Blogging week! Today’s project is a fun one for the little girl in your life!!


My daughter is 2yrs old and loves pink, yellow and all things fairy related!! I had this paper mache wand just begging to be decorated so I coated it with yellow paint and waited for it to dry. I stamped the sentiment using the Celebrations Demi Phrases and the Font set from the 2” Font and Center Set. The beautiful heart image is from the Favorite Occasions Borders and Centers Set. I stamped it all in Memento Tuxedo Black and coloured the heart in markers and a blender pen. It was cut out using the Large Circle Spellbinders and matted with pink cut using the Small Circle Spellbinders. I glued it to the wand, added some pink Kaisercraft Rhinestones to each point and some pink ribbons to the handle of the wand.

Because all girls like to put their treasures in boxes I made a matching 2-5-7-10 box (found at SCS - http://www.splitcoaststampers.com/resources/tutorials/2_5_7_10_box/ ) using yellow card for the base and some My Mind’s Eye Abbey Road paper to decorate the front. Once again I use the 2” Font and Center Set to make the sentiment in the Favorite Occasions Borders and Centers Set for the heart and coloured it to match. My daughter loves a show called ‘The Fairies’ where everything is ‘Fanfairytastic’ so it seemed the perfect sentiment to add!!

Stamps – Celebrations Demi Phrases, 2” Font and Center Set, Favorite Occasions Borders and Centers.
Paper – Yellow, White, My Mind’s Eye Abbey Road DP
Ink – Memento Tuxedo Black
Accessories – Paper Mache Wand, Large, Large Scallop and Small Circle Nestabilities, Pink Kaisercraft Rhinestones, Markers, Blender Pen, Scor Pal, Grosgrain Ribbon, 1/8 circle punch, double sided tape, Fiskars Border Punch.

I can’t believe the week is almost over and I hope you stop by tomorrow for one last project for the week!

Hugs
Kathy J

Keep us in mind....."When it needs to be JustRite".

Wednesday, November 11, 2009

Coffee Lover's Hamper- Day 3 Kathy Jones

Today Kathy has a great Holiday Gift Idea using our Just A Little Caffeine Stamp Set.
and a great Aussie Recipe for you to try.

Hello and welcome back to my next project for the week! Today’s project is for all the coffee lovers out there. I actually have a confession to make --- I don’t drink coffee at all!


I am however; married to a coffee addict and know many people who love it as well, so I decided to make a coffee hamper featuring some coasters! I bought theses round chipboard shapes made by Kaisercraft at my local hardware store of all places and painted them in Antique White paint.
Then I stamped four of the centers and borders from Just A Little Caffeine Set in chocolate ink and lightly coloured parts of them and cut them out using the Large Circle Spellbinders set. I then cut out some chocolate scallop circles to mat them with and glued them to the coasters. I used some spray varnish to seal and protect each coaster, giving each a couple of coats. To finish the hamper I added a bit of calico, some Gloria Jeans coffee, a one cup plunger and some Anzac Biscuits (Cookies in Australia are called Biscuits) tied with some brown satin ribbon.

Recipe for ANZAC Biscuits

Ingredients –
1 cup plain flour
1 cup rolled oats
¾ cup coconut
¾ cup sugar
140g butter (4.9oz)
3 teaspoons Golden Syrup (made from cane sugar has a smooth buttery flavour compared to Maple Syrup)
3 tablespoons boiling water
1 teaspoon baking soda

Method –
Sift flour into a bowl.
Add rolled oats, coconut and sugar.
Melt butter in saucepan, add syrup and water.
Add baking soda, allow to foam and pour immediately into dry ingredients.
Mix well then take small pieces of mixture and press out thinly on greased trays, allowing space for each to spread.
Bake in a slow oven as they burn easily.

(note – these are a firm, chewy biscuit/cookie)

Stamps – Just A Little Caffeine
Paper – Very Vanilla and Chocolate Chip
Ink – Chocolate Chip
Accessories – Kaisercraft Circle Coasters, Large Circle and Scallop Circle Nestabilities, Markers, Blender Pen, Spray Varnish, Glue.

Hope you enjoyed today’s project and pop by tomorrow for something for the little girls in your life!!

Hugs
Kathy J
Keep us in mind....."When it needs to be JustRite".

Tuesday, November 10, 2009

JustRite Purse- Day 2 - Kathy Jones

Today - Kathy has a great gift idea to share.
Today’s project is a handbag shaped gift or storage box. The handbag is a wooden kit from Kaisercraft and comes as bare chipboard. I took each piece and painted it with Antique White paint a couple of times for good coverage and waited for it to dry. I then cut out the paper for the front from Kaisercraft’s Vagabond paper range to cover the front. Across the bottom I added a strip of cream card that had been punched on one side with the Fiskars Upper Crest Border Punch and adhered some sage ribbon over the top. Using the Bow Easy I made a matching petite bow to add to the side. On the handle I tied some cream satin ribbon and added a green prima flower with a Blush Pearl. Underneath the flower are some chocolate flourishes cut using Doodle Parts Spellbinders set.
The Monogram centre has been stamped using the 1 3/16 Damask Border and Font Set, coloured with markers (chocolate chip, sage shadow) and cut using the Large Circle Spellbinders set. The monogram has been popped up on a Label 4 die cut that has been embellished more Blush Pearls.

Stamps – 1 3/16 Small Damask Border and Font Set
Paper – Cream Bazzill, Chocolate Chip, Kaisercraft Vagabond DP
Ink – Chocolate Chip, Sage Shadow
Accessories – Doodle Parts Spellbinders, Large Circle Spellbinders, Label 4 Spellbinders, Prima Flower, Kaisercraft Blush Pearls, Fiskars Upper Crest Border Punch, Sage Satin Ribbon, Cream Satin Ribbon, Bow Easy.

Hope you enjoyed today’s project and pop back tomorrow for a simple project for the coffee lovers out there!!

Hugs
Kathy J


Keep us in mind....."When it needs to be JustRite".

Friday, October 30, 2009

Day 5 with Sharon Harnist -

A Huge THANK YOU to Sharon for sharing all her great project ideas with us this week. It was truly inspirational!! Remember you can visit Sharon daily on her blog Paperfections. Today Sharon has a fun project and a sneak peak of one of our stamps from our November Collection.

I’m wrapping up this week of guest blogging with a gift idea that’s good for just about any occasion, holiday or celebration … a wine gift set!10-5-WineSetSH

My wine bottle tag is quick and easy to create and dresses up the bottle, for a nice presentation. You can customize the tag with a sentiment or image specific to the occasion or even the monogram of the recipient. Here, I went with a sentiment that could be used for the Thanksgiving holiday … what a nice hostess gift this would be for either the host of your holiday celebration or even to the guests that share the holiday in your home!

This bottle is a little taller than the others in my collection, standing at about 13” (750ml bottle), so you may need to adjust the length of your tag by just trimming the bottom a little if it’s too long.

Start with a piece of cardstock cut to 2.75” x 10.25” (again, you may need to adjust the width of your tag if your bottle is a little wider and you want the tag to cover the wine label. Score 2.75” from the top end – this will create the neck of the tag that will bend over the neck of the bottle. Punch a hole in the center of the scored end – a 1.25” punch worked fine for my bottle. Now just decorate however you wish!

For my tag, I used this beautiful sentiment center and scroll border from JustRite’s large oval set, Autumn Blessings, stamped in simple and elegant basic black on cream cardstock. I die cut the entire image with Spellbinders Classic Oval Nestabilities (2nd to the largest die in the large set), which matches this oval stamp set shape perfectly! Next, I adhered the oval sentiment to the tag, and then embossed the Classic Scalloped Oval over it (again using the 2nd largest die in the large set).

10-5-WineLabelSH

I finished the tag with some strips of punched note card left over from making the matching greeting card, a strip of clear Zva crystals and Heidi Swapp flower crystal on the sentiment oval.

10-5-WineCardSH

The matching greeting card was made from a coordinating box of blank note cards – I cut and combined some of the cards. Where the patterns meet on the lower part of the card, I added a strip of black velvet ribbon and Zva clear crystals on top of that!

This card also has the sneak peek I spoke about yesterday of a brand new JustRite product … yes, a SQUARE monogram/decorative frames borders!! Did you hear me squeal? I’ve been anticipating this product for quite some time!! More details about this set and and all the November release products right back here on the JustRite blog on Monday!

10-5-WineCardSqSH

The gorgeous monogram frame was stamped with black ink on cream cardstock and then die cut with Spellbinders Classic Square Nestabilities. It is popped up on foam tape on another piece of black cardstock die cut with Spellbinders Labels Three. Zva crystals adorn the corners and silver leafing pen outlines the square. What fabulous fun you’ll be able to have with this great new shape! Remember to check back here on Monday for all the details!

It’s been a pleasure sharing with you this week!

Sharon

Supplies --
Stamps: JustRite Autumn Blessings & Deluxe Square Monogram Kit (with Special Occasions font)
Paper: Neenah Classic Cream, Papertrey Ink True Black, The Paper Studio Simple Elegance box of textured cards (Hobby Lobby)
Ink: Memento Tuxedo Black
Accessories: Spellbinders Classic Square (middle die in large set), Classic Oval-Lg & Scalloped Classic Oval-Lg Nestabilities dies, Spellbinders Labels Three set (3rd largest), Martha Stewart Simple Scallop edge punch, EK Success 1.25” circle punch, corner rounder punch, May Arts black velvet ribbon, Zva & Heidi Swapp crystals

Keep us in mind....."When it needs to be JustRite".

Wednesday, October 28, 2009

Day 3 with Sharon Harnist – Family Bingo

10-3-BingoFamilySH

Today I have a scrappy home decor project to share with you that can easily be customized for whatever season, holiday, or celebration you wish since it uses JustRite’s fonts!  The base of this 6.25” x 7.25” plaque was a $1 find at Hobby Lobby.  I decoupaged it with some of my favorite dark red BasicGrey paper.

10-3-BingoFamilySneakSH 

I love the trendy look of Bingo cards in just about any area of crafting these days – altered art, card making, and scrapbooking. This Bingo card is a download I created specifically to accommodate JustRite’s fonts! 

A little info about these Bingo cards: I have used the largest brown card here (4.25” x 5.50”) which accepts JustRite’s 95-point font perfectly.  (There is also a smaller 3” x 3.50” size that fits the 50-point fonts and both card sizes are available in either brown or black ink to print from your computer).  The cards are available either with numbers or blank, so you can even customize them with JustRite’s numbers that come in all of the font sets!  Now you’ll never be limited to a certain color or pre-printed word on your Bingo cards!

I printed my Bingo card on light weight (about 65-80 lb.) vanilla cardstock.  Here, you can see how easy it is to place the Horizontal Wood Stamper at the top of the card and use the card as a guide for your letter spacing:

10-3-BingoFontSH

I used my favorite Brayton 95-point font and stamped it with Memento Rhubarb Stalk ink.  And since each of JustRite’s font sets contain three different sizes (95, 50, and 25-point), alpha letters as well as numbers, you’ll be all set to make any size of customized Bingo cards, titles for scrapbook pages, or sentiments for your cards or home decor!

You could also make this project with the word “Thanks” on the Bingo card and maybe a snapshot of the family that is hosting any of your holiday celebrations … what a wonderful hostess gift for them that won’t soon be forgotten!  I can also see this project created for a sweet new baby – what a priceless treasure for his/her parents!

A few more details about my project:  After I stamped the word “Family” on my card, I crumpled it up and then flattened it back out, distressed the edges, and then aged the card with Antique Linen distress ink.  I glittered the plain adhesive chipboard pieces on the sticky backing with Martha Stewart garnet glitter and then just used foam tape and glue dots to adhere them to the card. 

10-3-BingoFamilyCloseFSH

The Prima flower started out white – I stamped the text onto it with red ink and then distressed it with Antique Linen ink.  I also gave the scalloped plaque base a protective coating of decoupage glue on the top of the paper.  The photo of my sweet family was printed in sepia tones and now I can hang them close by and keep an eye on them at all times!

You are certainly welcome to download and print out these Bingo cards (here) for your personal crafting and if you do, we would love to see your creations with them, so please leave a link for us in the comments on this post!

Supplies --
Stamps: JustRite Brayton Uppercase font (95-point) + Horizontal Wood Stamper, CHF Vintage Text Scrapblock
Paper: BasicGrey Wassail-Cranberry Sauce, Stampin’ Up Vanilla
Ink: Memento Rhubarb Stalk, Ranger Antique Linen Distress Ink
Accessories: Downloadable Bingo card from PaperFections, plaque from Hobby Lobby, Papertrey Ink buttons & twine, American Crafts Thickers chipboard, Martha Stewart garnet glitter, Prima flowers, Maya Road pom-pom trim, May Arts ribbon, Tonic Paper Distresser, ModPodge, foam tape

Keep us in mind....."When it needs to be JustRite".

Thursday, September 24, 2009

Angela's JustRite Desktop Calendar

Don't forget that today is the last day of the Font Sale. Save 30% off all JustRite Font & the Horizontal & Vertical Stamper. Sales ends at midnight (Pacific Time Zone).
For the next two days Angela Barkhouse is guest blogging and sharing with us this terrific calendar she designed using a variety of JustRite Products.

Here's Angela:

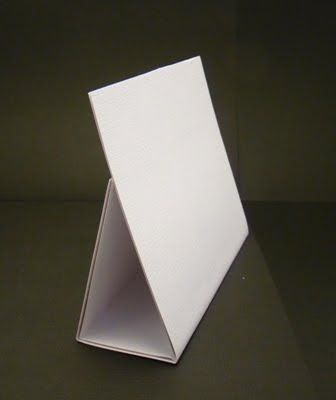
The idea for this project came to me in the middle of the night. I woke up out of a sound sleep, went to my design room and drew it out on a piece of paper so that I wouldn’t forget it by morning. To begin my calendar, I needed to create a stand for it. To do this, I took a 10 1/2” x 6” piece of cardstock and scored it at 5” & 7”. For stability I cut pieces of chipboard, adhered it to the cardstock
and then covered it with another piece of cardstock. I applied adhesive to the back to make the stand.
Now for the fun part of my project – designing the calendar pages. For each month I chose the designer paper first and then chose the ink color to match.

I used the new Calendar Borders & Centers set from JustRite Stampers. This set is perfect for someone like me who is just learning to color – this set needs little to no coloring.
Each month was stamped twice onto white cardstock and then diecut using the Spellbinders Oval Nestabilities, which is a perfect match to this stamp set. I used pop dots between the month & border as well as between the border and my designer paper.
I made the mini calendar on my computer and cut it out –( FYI – the size of the mini calendar is 3 ½” x 1 5/8”) and then I matted the calendar onto matching cardstock.
Each calendar page measures 6” x 4 ¾” – cut from corresponding cardstock. The designer paper is cut 5 3/8” x 4 5/8”.

For the month of January I used a piece of snowflake paper from the DCWV Christmas Stack. The month “January” was stamped onto white cardstock using Brilliance Sky Blue. The stamped snowflake is from the Merry Little Christmas set by JustRite.The snowflakes were cut using the EK Success Kaleidopunch snowflake. Each snowflake has a Kaiser rhinestone in the center and I placed 3 Kaiser rhinestones below the month.


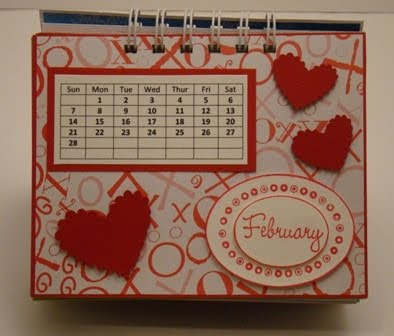
For the month of February I used a piece of OXOX paper from the DCWV Spring Stack. The month of “February” was stamped onto white cardstock using Brilliance Rocket Red. The hearts were cut using my Cricut Expression and the Doodlecharms cartridge.

For the month of March I used a piece of St. Patrick’s Day paper from the DCWV Spring Stack. The month of “March” was stamped onto white cardstock using Versamagic Tea Leaves. I used the St. Patrick’s Day center from the Favorite Occasions Borders & Centers set stamped onto white cardstock using Versamagic Tea Leaves, colored the image with my Copics, then mounted onto brown cardstock. The shamrocks were cut using my Cricut Expression and the Doodlecharms cartridge.

For the month of April I used a piece of Easter paper from the DCWV Spring Stack. The month of “April” was stamped onto white cardstock using Versamagic Pink Grapefruit. The eggs were cut using my Cricut Expression and the Doodlecharms cartridge. Then I applied Stickles to decorate the eggs.
For the month of May I used a piece of “Mother” paper from the DCWV Spring Stack. The month of “May” was stamped onto white cardstock using Versamagic Pink Petunia. . Using the small horizontal wood stamper, I used the Curlz 25 point font and spelled “Moms Are Special” & “I’m Glad You’re Mine” and then diecut them using the Spellbinders Blossom Nestabilities. The flowers are from Creative Impressions with Kaiser rhinestones in the center.
For the month of June I used a piece of BBQ paper by Flair Designs. The month of “June” was stamped onto white cardstock using Versamagic Jumbo Java.The “#1 Dad” ribbon was made using the 50 point Curlz font as well as the Spellbinders Pinking Circle Nestabilities. The “Dad” embellishment is from my stash.


Stop back in tomorrow to see the second half of Angela's calendar.
Keep us in mind....."When it needs to be JustRite".

Tuesday, September 15, 2009

Day Two with Barb Schram - JustRite Playtime

Today Barb has the sweetest personalized card and a gift using JustRite Font!! The JustRite Mega Font Hop starts on Thursday at 8 am EST and is a Two Day Event with a Big Announcement - you won't want to miss!! I can't wait to see what this team of SUPER Talented women make!!

JustRITE Playtime Fun


One of the features I like best about JustRite fonts is they can be used alone or added to any creation I want! For my design today, I decided to utilize JustRite’s Brayton Font to create a name plate on my card. A long overdue baby card and gift is finally complete, Hooray! Not overdue, in the sense of baby being overdue, but meaning finally getting this gift completed! Isn’t this little guy the cutest? He is stamped with Memento tuxedo black ink and colored with Copic markers.

Adding letter blocks to spell “Cooper” seemed very appropriate for a bit of room decor! After all, the little guy is playing with blocks on the card! The wooden blocks measure
1 ½” and are painted with white acrylic paint. The card’s ring frame is thin chipboard covered with blue cardstock, and painted with white acrylic paint. I sanded to bring back some blue, and then cut with Spellbinders Classic circle dies.

For letter and name stamping, I used my JUST RITE Brayton Font and 1 3/8” x 3 ½” rectangular stamper. The 95pt. font on the blocks and the 50pt. font on the card’s name plate.

All JustRite Stampers boxed font sets include THREE font sizes. Gotta love that! For this project I used the 95pt to create my blocks.
I stamped first and then positioned my 1 3/8” square punch to cut out the patterned paper squares. Much easier that way! I proceeded to punch out all patterned paper squares for the blocks, and adhered with Mod Podge. Using my rubber brayer aided in securing the squares and removing any air bubbles. After blocks were dry, I sanded and lightly misted with matte finish sealer.
Cooper Name Plate was created using 50pt. Font I trimmed the name plate to fit my card design and clipped corners for added interest. Adhesive black pearls complete the Brayton font “Cooper” name plate for a finished look. Glue dots hold the name plate in place.

I hope you make room for some JustRite playtime fun, adding that personal touch to your creations! Create home décor, attach a name, or add a special message, making your creations JustRite! Take good care and I’ll be back tomorrow!


Supplies:


StampsJustRite Uppercase Brayton Font, 1 3/8” x 3 ½” Rectangular Stamper, GinaK Designs little guy at play
Ink – StazOn Black, Memento Tuxedo Black
Paper – Papertreyink Stampers Select white, Spring Rain, and Men of Life patterned papers
Accessories – Papertreyink spring rain twill, Misc. stripe ribbon and buttons, Spellbinders Classic circle dies, chipboard, needle and string, adhesive pearls, ticket corner punch, Glue dots, foam dimensionals, Mod Podge, Acrylic white paint, sponge brush, Sanding block, Matte finish spray sealer,
Copic markers: Y15, Y17, Y21, YR68, R27, R29, E00, E04, E31, E33, B21, B24, BG10, YG03, YG06, RV11, C1, C3, 0 (colorless blender)


Keep us in mind....."When it needs to be JustRite".

Tuesday, July 7, 2009

Guest Blogger Kathy Jones Day 2 _ Personalize It

Good Morning Everyone!! We are so excited here at JustRite - because today's is our official release day for the Summer Release # 1!! Wahoo!! Product is live on the website- Happy Shopping! We have two posts here on the JustRite Blog this morning - scroll down to see all the items which are available for shipping today. They are linked directly to the website.

Our design team has been very busy too! Be sure to visit Lauren Meader's Blog, Michele Kovack's Blog , Barbara Schram's Blog to see their Friendship Posts. SO much Fun!! You need to see their projects before you start shopping today!!

Do you have any JustRite Font yet?? It is the perfect go to item for customizing cards and personalizing projects. A simple must have!! Kathy Jones uses it on everything and today Kathy has designed a very personal project!

Hello Everyone and welcome to Day 2 of my Guest Blog Week!! Today’s project is one of my favourite types of Beyond the Page things to make ---- a Lunch Tin!!! This particular one is going to a pre-teen girl who loves blue! This particular tin is made by Provocraft and I’ve used some pretty Sweetwater paper (blue floral – Family Ties paper collection) and Rusty Pickle (dots – Connor’s Wallpaper). First thing I did was cut some strips of paper – two strips of blue and two strips of the dots. With the front blue strip I’ve found the top middle and used the template found here - http://images.splitcoaststampers.com/data/ee/images/tutorials/tinwithnotch.pdf to mark and cut out the front notch. Once that was done, applied several strips of double sided tape and carefully stuck it to the tin. Then add the back paper in the same way ignoring the notch step. Once those are down, I’ve applied the bottom dotted strips in the same way making sure they overlap at the same place to give a nice smooth line on each side. Around the lip of the lid and over the horizontal join lines I’ve added some white 3/8 inch grosgrain ribbon. The lid has been covered using the same template, although I found that the holes for the handle need to be widened a bit. Once the template has been transferred onto the paper, I cut it through the holes and placed on each side of the handles, adjusting as necessary and then sticking with more double sided tape.

Once the tin is covered you can add your embellishments!! In this case, I am putting the recipients name on the front using the Curlz Font Set in the largest font and the Rectangular Stamper, stamped in Close to Cocoa ink and cut out using Label 4 Nestabilities dies and matted with blue cut from the same die set. The flowers are Baby Blue and Taupe Kaisercraft and the pearls are Chino Kaisercraft. The flourish under the largest flower has been cut out of Fawn Bazzill with Floral Accents dies by Spellbinders. The tag on the top is made using the 1 3/16 inch circle stamper and the Tiny Words Set. I thought a girl of this age might like to keep her tin private, so I used the Don’t Peek centre and the flourish border, stamped in Brocade Blue and cut out with Circle Nestabilities, matted with a Fawn scalloped circle. The ribbon has been glued between the layers and tied to the handle. Finally add some more tied ribbon to the handle and you’re finished!!

Hope you’ve enjoyed today’s project and don’t forget to stop by tomorrow for another one!!

Kathy


Keep us in mind....."When it needs to be JustRite".

Monday, July 6, 2009

Guest Blogger Kathy Jones Day One

Congratulations to our last Summer Release #1 Blog Candy winner who has won our New Oval Calendar Set.

The Winner is:
Random Integer Generator
Here are your random numbers:91
Timestamp: 2009-07-06 11:03:39 UTC

Anemone said...
I usually buy my Christmas stamps anywhere between July & September. I start my cards early, so that I can finish in time! I probably average about 100 cards each year.
July 4, 2009 11:07 PM

Sit back with a cup of Coffee or a glass of wine and enjoy all the projects that Kathy Jones from Australia has cooked up for you this week. From Fun 3-D projects to beautiful cards- Kathy has lots of fun projects in store for you this week.

Hello Everyone and welcome to the first day of my Guest Blog Week! Each day this week I’ll be posting projects made using different JustRite products, so I hope you come back and see what’s new!
Today’s projects are Wine Glass Charms and something I thought of as soon as I saw this cool ‘Girl Time Set’!! I love this cool set with it’s fun images and just reminds you of fun times with your girlfriends!

I started with some Polyshrink (shrink plastic that probably comes in various types, but this is the brand I have). Now I was new to shrink plastic, but gee it’s so fun to play with! The lesson I learned is that the colours darken a lot when they shrink and make sure there is no other mark, no matter how tiny, because it will show up later! I lightly rubbed my nail file block over it because I didn’t have any fine sandpaper and then grabbed my Girl Time stamps and stamped each one in Jet Black Stazon. When dry I coloured each one with markers, cut out with circle nestabilities and then punched a ¼ inch hole in the sides. I shrunk each one using my heat gun while it was lying on some paper (so you don’t do something horrible to your furniture – don’t ask me how I know this!). Once the project is shrunk to size, I attached a split ring in the hole so that the charm lies flat when you use it. Then I grabbed some coloured wire, looped one end and added a crimp (squashed) to stop the beads moving, two small beads, then the charm and two more matching beads, crimp at the end and finishing off with a loop at the other end of the wire.

A little something that is fun and unique and perfect for my next Girls Night In! Hope you stop by again tomorrow for the next project!!

Kathy

Keep us in mind....."When it needs to be JustRite".

Friday, June 26, 2009

Day 5 with Michele Kovack - Girl Time

It's a busy day at the JustRite Blog!! If you came here looking for the Summer Release # 1 Reveal - you can find it by scrolling down through all Michele's fab eye candy and reading the post before this or by clicking here

A Special Thanks to Michele Kovack for Guest Blogging here on the JustRite Blog this week. It was an amazing week chalked full of inspiring projects!! If you would love to continue seeing more projects from Michele please be sure to visit her blog Thoughts of a Cardmaking Scrapbooker.

Today Michele has designed 4 great cards using our Girl Time Set.
For my last and final day as Guest Blogger, I wanted to show some fun cards using the Girl Time set.

For my first card I used this fun paper by K & Company. The image was stamped twice. The first image was cut using Spellbinders Circle die. On the second image the glass was colored using my Copics and then cut out. I placed it on a pop dot on top of the second image. I added a silver sticky "pearl" to the center of the clock's hands. The circle around Happy Hour was gussied up using a Sakura glue pen and glitter. I added several layers of circles, scalloped circle and Labels die. I threaded a ribbon through and tied a Maya Road clear pink pineapple to add a bit of whimsy!
This card uses Archiver's paper. The martini glass was colored with Copics and cut out. I stamped Girls Night Out and cut the circle in half. The white cardstock was scored to give it a subtle texture. I layered the glass, circles and papers. I added a couple of buttons and a ribbon to finish it off.
This cute lil' purse was cut using my Cricut machine. (Tags, Bags, Boxes, and More, cartridge) The paper is by SU! I stamped the purse in pink and added a itty bitty pearl. I used my Nesties, added some pink ribbon, a satin handle, and a glittery Prima flower. You could tuck a small sweet surprise in this wee purse!
This purse was cut using a SU! template. The paper is by Wild Asparagus and Webster's Pages. The image was stamped and little flower was added to it. The Nesties were used once again! I added a few little pearls to the bottom of the purse and a satin handle.

I have had so much fun being the guest blogger for JustRite! I love their products and hope I've inspired you this week!
Be sure to leave Michele a comment and tell her which project was your favorite.
Keep us in mind....."When it needs to be JustRite".