Showing posts with label Lisa Somerville. Show all posts

Friday, October 24, 2008

Day Five with Lisa Somerville - Gift Card Tin & Ornament

A big THANK YOU to Lisa Somerville for sharing all her inspirational projects with us this week.If you would like to continue being inspired by Lisa visit her blog Splendiferous Creations. Today Lisa has two great projects to share.

Customizing Gift Card Tins is a breeze with the JustRite Christmas Stamp Ensemble Kit and Harmony Classic Circle III. I found my Gift Card tins at my local Walgreens store.


Cut your paper to size, then adhere it to your tin using glue stick. Wrap your ribbon round another strip of designer paper, tie and attach to your tin as shown. Using the JustRite Christmas Stamp Ensemble Kit and your Harmony Classic Circle III, ink "Merry Christmas" in Baja Breeze ink, stamp on your vanilla card stock, then cut with your circle nesties. Cut a piece of chocolate chip card stock to layer under this circle. Stamp the snowflakes and cut with your nesties. Layer all three circles, attach to tin as shown. Add stickles if desired. Now your tins ready for gift giving!

Supplies:
JustRite Stamps
- Christmas Stamp Ensemble, Harmony Classic Circle III
Ink - Stampin' Up! Baja Breeze, Chocolate Chip
Card Stock - Very Vanilla, Ski Slope DSP, Chocolate Chip
Accessories: 5/8" Chocolate Grosgrain, Circle Nesties, Stickles, Gift Card Tin, Glue Stick
Christmas Photo Ornament

If your a room parent you're gonna just love this craft project! My boys are too old for room parties, but I wish this was available when I was doing the party planning for school room parties! What an expensive craft. Cover your 4" coasters using a glue stick and your designer paper of choice. Punch holes with your Crop-a-Dile and tie on your ribbon. I used my Times Roman Font on my Harmony Rectangular Stamper Kit, to stamp the year in Chocolate Chip ink on the bottom. I stamps Merry Christmas from the JustRite Christmas Stamp Ensemble in Riding Hood Red on Vanilla card stock, then punch with my nesties. My other circles are also punched with my nesties from Chocolate Chip and Kiwi Kiss card stock, as well as my son's photo. Layer your circles as shown, attach to your chipboard base. Wonderful ornaments to give as gifts, hang from packages, or hang on your own Christmas Trees.


Supplies:
JustRite Stamps - Christmas Stamp Ensemble, Harmony Classic Circle III , Times Roman Font, Harmony Rectangular Stamper Kit
Ink - Stampin' Up! Riding Hood Red, Chocolate Chip
Card Stock - Very Vanilla, Ski Slope DSP, Chocolate Chip, Kiwi Kiss
Accessories: - 5/8" Chocolate Grosgrain, Circle Nesties, Crop-a-Dile, Chipboard Coaster, Glue Stick

Keep us in mind....."When it needs to be JustRite".

Thursday, October 23, 2008

Day Four with Lisa Somerville- Door Plaque

Today is the last day to vote in the Pre-Inked Stamping Contest. You may vote for your favorite card in the pre-inked stamping contest by clicking here. You may vote for your favorite project in the pre-inked stamping contest by clicking here. Voting will be open until 8 pm EST Thursday Oct 23rd. Vote by leaving a comment on each post. The Grand prize winners will be announce on Friday.


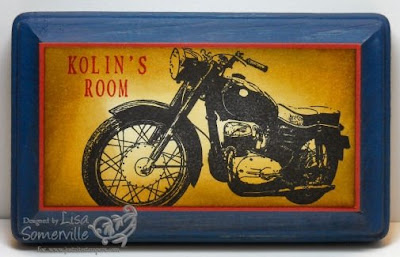
Welcome to Day 4 with Lisa Somerville. Today Lisa show's us how to design a personalized door plaque.The JustRite Stampers Font Sets and Stamper Sets make personalizing your projects a snap! I love the new Rectangular Stamper Set, it's perfect for adding your own sentiments to your projects, or personalizing projects like I've done here!


I picked up the wood plaque at my Michaels store, painted it with Gesso and let it dry. I then used my Adirondack Acrylic Paint Dabber in Denim to add color, and let it dry. Before I stamped my image for my project, I placed my Times New Roman Font - size 25 onto my Harmony Rectangular Stamper Set. Then I inked it with Riding Hood Red using my Stamp-a-ma-jig, I stamped it on my image sheet so that I could use it for proper placement later in my project.
I stamped my image (Artistic Outpost - Route 66 Plate) in Black on vanilla card stock, let dry. I inked the sentiment I created earlier in Riding Hood Red, and using my Stamp-a-ma-Jig,
stamped it onto my card stock as shown.


Using my Distress Inks, Craft Sheet and Blending Tool, I applied the Straw ink, completely covering my project, then used the Corduroy around the edge, and finished with Black Soot. I adhered my image to a piece of Riding Hood Red card stock, then to my plaque using Tombow Multi Glue.

Once dry, I've created a great door plaque - perfect for gift giving!

Supplies:
JustRite Stamps - Times New Roman Font Set, Harmony Rectangular Stamper Set,

Stamps -Artistic Outpost Route 66
Ink - Ranger Black Archival, Ranger Distress Inks - Straw, Brushed Corduroy, Black, Stampin' Up! Riding Hood Red
Card Stock - Vanilla, Riding Hood Red
Accessories - Craft Mat, Ink Blending Tool, Stamp-a-ma-jig, Adirondack Acrylic Paint Dabber - Denim, Wood Plaque - Michaels, Gesso, Sponge Applicator, Tombow Multi


Keep us in mind....."When it needs to be JustRite".

Wednesday, October 22, 2008

Day Three with Lisa Somerville- Monogrammed Card Set -using Luxe Stamper

Voting is still open for our Pre-Inked Stamping Contest. You may vote for your favorite card in the pre-inked stamping contest by clicking here. You may vote for your favorite project in the pre-inked stamping contest by clicking here. Voting will be open until 8 pm EST Thursday Oct 23rd. Vote by leaving a comment on each post. The Grand prize winners will be announce on Friday.

Welcome to day 3 with Lisa Somerville. Today Lisa share's with us a great economical notecard set that you can make using the Luxe (c30 stamper) in a matter of minutes.

Dollar finds make great gift sets!

While searching through the dollar section at Michaels, I stumbled across some great 3" x 3" cards that also had matching A2 sized cards. For my project today I incorporated both of these items into a great Monogram Gift Set, using my C30 Stamper. (Luxe Stamper)

Because my cards were already made, the only thing I had to do was stamp my monogram, punch them out and adhere to my cards. I inked one side of my Stamp Pad with Chocolate Chip ink, inserted my letter of choice and Damask border and stamped my letters on Baja Breeze card stock, punched them out with the 1-1/4" circle punch, and layered them on a 1-3/8" Chocolate Chip punched circle, then onto my 3" x 3" cards. The C30 Monogram Stamper works perfectly with these circle punches, and makes personalizing gift sets a breeze!

The card you see on the front of my box was cut from the A2 card, and layered onto my box, before I assembled it. I also punched the holes for my Shaker Book Knob before assembling (trust me, it's easier to do that before you sticky strip your box).


Here is a view to show you visually the difference in size between the c30- Luxe Stamper and the c-45 Monogram Stamper. The C30 is perfect for small notecards, table place cards for special events and smaller projects.
SPECIAL SAVINGS: C30- Monogram stamper is on sale for $18.95 - Save $3.00!! Click here to place your order.


Supplies:
JustRite Stamps - C-30 Monogram Stamper -newly named Luxe Stamper
Reinker - Stampin' up Chocolate Chip
Punches - 1-1/4" Circle, 1-3/8" Circle
Accessories: Other - Shaker Book Knob, Sticky Strip, Pre made cards from Michales $ spot
Card Stock - Baja Breeze, Chocolate Chip

Keep us in mind....."When it needs to be JustRite".

Tuesday, October 21, 2008

Day Two with Lisa Somerville - Noel Blocks

You may vote for your favorite card in the pre-inked stamping contest by clicking here. You may vote for your favorite project in the pre-inked stamping contest by clicking here. Voting will be open until 8 pm EST Thursday Oct 23rd. Vote by leaving a comment on each post. The Grand prize winners will be announce on Friday.

Welcome to Day 2 with guest blogger Lisa Somerville. Lisa has designed this great Home Decor Project just in time for the Holidays. This would be a great teacher or secret Santa gift and is a fabulous way to use your scraps.


I found these 1-1/2" x 1-1/2" blocks at my Michael's store - they are relatively inexpensive, about $1 per block. I cut my Ski Slope DSP to fit my blocks, then stamped my letters with my Pre-Inked Uppercase Typewriter Letters, these pre-inked letters made stamping a breeze - I just centered them on my cut paper and pressed down. I edged my papers with brown ink and a sponge dauber and used Tombow Mono Multi Liquid Glue to attach my patterned paper to my wood blocks, sanding where needed once dry. I tied on various ribbons and used glue dots to attach some Making Memories Charms, Poinsettia's, and Felt Flurries (with Rhinestone centers) to my ribbons.


Supplies:
Blocks
- Michael's
Designer Paper - Stampin' Up! - Ski Slope
JustRite Stamps - JustRite Pre-Inked Uppercase Typewriter Letters
Ink - Chocolate Chip - Stampin' Up!
Ribbon - Stampin' Up! - 5/8" Chocolate Grosgrain, Alpine Ribbon Originals, Riding Hood Red Taffeta, 5/8" Old Olive Grosgrain, Whisper White Taffeta
Accessories- Felt Flurries - Stampin' Up!, Rhinestone Brads - Stampin' Up!, Pointsetta and Charm - Making Memories, Glue Dots - Stampin' Up!, Tombow Mono - Stampin' Up!, Sponge Dauber - Stampin' Up!, Sanding Block - Stampin' Up!


Keep us in mind....."When it needs to be JustRite".
Monday, October 20, 2008

Day One with Lisa Somerville -Mongrammed Bracelet and Jewelry Box

You may vote for your favorite card in the pre-inked stamping contest by clicking here. You may vote for your favorite project in the pre-inked stamping contest by clicking here. Voting will be open until 8 pm EST Thursday Oct 23rd. Vote by leaving a comment on each post. The Grand prize winners will be announce on Friday.


Welcome to Day One with Lisa Somerville. Today Lisa has designed a monogrammed bracelet and matching jewelry box. This would be a perfect Chiristmas Gift.


While I was at CHA this summer, I stopped by the Amate Studios Booth to do a Make and Take, they have great jewelry pieces you can alter with stamped images or your Melting Pot. I was also lucky enough to receive a blank piece for altering at home, and the JustRite Monograms are perfect for these pieces. I stamped my Flourish image in pink on vanilla card stock, then used my Luxe Stamper to stamp my "K" monogram in brown ink. I placed a dot of Ranger Glossy accents in the bottom of the jewelry piece to hold my card stock in place, then poured in some UTEE that I melted in my Melting Pot. Then left it to dry.

If you're looking for these jewelry pieces to alter - Kitchen Sink Stamps is carrying them - Amate only sells wholesale. Now I just needed to create a matching box to complete my gift set.


I found my wooden box at my local Michael's store - it's neat - as the lid is a shadow box. To alter my box, I first painted it with Gesso, then let dry. Then I used my Radiant Rain Dauber in Pink Azalea to add color to my box. Once dry I stamped my Flourish images in brown, and edged my box with a sponge dauber and brown ink.

To create my monogram, I stamped my Flourish in pink on vanilla card stock, then used my Deluxe Inking Stamper to stamp my "K" in brown ink. I cut my piece to size, edged my card stock with a sponge dauber and brown ink, and placed it inside the shadow box lid. Now I've got a great gift - perfect for one of my nieces for Christmas!

Supplies:
Ink
- Stampin' Up! Chocolate Chip, Pixie Pink
Card Stock - Vanilla
JustRite Stamps -Luxe Stamper
Stamps: Artsy Swirls , Deluxe Inking Stamper
Accessories: Gesso, UTEE, Ranger Melting Pot, Amate Jewelry - Bracelet, Wooden Shadow Box - Michaels, Radiant Rain Dauber, Ranger Glossy Accents, Sponge Dauber

Keep us in mind....."When it needs to be JustRite".