Showing posts with label JustRite Font Projects. Show all posts

Wednesday, October 28, 2009

Day 3 with Sharon Harnist – Family Bingo

10-3-BingoFamilySH

Today I have a scrappy home decor project to share with you that can easily be customized for whatever season, holiday, or celebration you wish since it uses JustRite’s fonts!  The base of this 6.25” x 7.25” plaque was a $1 find at Hobby Lobby.  I decoupaged it with some of my favorite dark red BasicGrey paper.

10-3-BingoFamilySneakSH 

I love the trendy look of Bingo cards in just about any area of crafting these days – altered art, card making, and scrapbooking. This Bingo card is a download I created specifically to accommodate JustRite’s fonts! 

A little info about these Bingo cards: I have used the largest brown card here (4.25” x 5.50”) which accepts JustRite’s 95-point font perfectly.  (There is also a smaller 3” x 3.50” size that fits the 50-point fonts and both card sizes are available in either brown or black ink to print from your computer).  The cards are available either with numbers or blank, so you can even customize them with JustRite’s numbers that come in all of the font sets!  Now you’ll never be limited to a certain color or pre-printed word on your Bingo cards!

I printed my Bingo card on light weight (about 65-80 lb.) vanilla cardstock.  Here, you can see how easy it is to place the Horizontal Wood Stamper at the top of the card and use the card as a guide for your letter spacing:

10-3-BingoFontSH

I used my favorite Brayton 95-point font and stamped it with Memento Rhubarb Stalk ink.  And since each of JustRite’s font sets contain three different sizes (95, 50, and 25-point), alpha letters as well as numbers, you’ll be all set to make any size of customized Bingo cards, titles for scrapbook pages, or sentiments for your cards or home decor!

You could also make this project with the word “Thanks” on the Bingo card and maybe a snapshot of the family that is hosting any of your holiday celebrations … what a wonderful hostess gift for them that won’t soon be forgotten!  I can also see this project created for a sweet new baby – what a priceless treasure for his/her parents!

A few more details about my project:  After I stamped the word “Family” on my card, I crumpled it up and then flattened it back out, distressed the edges, and then aged the card with Antique Linen distress ink.  I glittered the plain adhesive chipboard pieces on the sticky backing with Martha Stewart garnet glitter and then just used foam tape and glue dots to adhere them to the card. 

10-3-BingoFamilyCloseFSH

The Prima flower started out white – I stamped the text onto it with red ink and then distressed it with Antique Linen ink.  I also gave the scalloped plaque base a protective coating of decoupage glue on the top of the paper.  The photo of my sweet family was printed in sepia tones and now I can hang them close by and keep an eye on them at all times!

You are certainly welcome to download and print out these Bingo cards (here) for your personal crafting and if you do, we would love to see your creations with them, so please leave a link for us in the comments on this post!

Supplies --
Stamps: JustRite Brayton Uppercase font (95-point) + Horizontal Wood Stamper, CHF Vintage Text Scrapblock
Paper: BasicGrey Wassail-Cranberry Sauce, Stampin’ Up Vanilla
Ink: Memento Rhubarb Stalk, Ranger Antique Linen Distress Ink
Accessories: Downloadable Bingo card from PaperFections, plaque from Hobby Lobby, Papertrey Ink buttons & twine, American Crafts Thickers chipboard, Martha Stewart garnet glitter, Prima flowers, Maya Road pom-pom trim, May Arts ribbon, Tonic Paper Distresser, ModPodge, foam tape

Keep us in mind....."When it needs to be JustRite".

Friday, September 18, 2009

Wahoo Day 2 of the JustRite Mega Font Hop

Welcome to Day Two of the JustRite Mega Font Hop! Today is the second day of a two day hop featuring 54 amazing designers – 28+ on each day! If you missed yesterday's blog hop you can find it by clicking here. (The links are all direct links to the designers font posts- so feel free to bookmark it in your favorties for future reference). We will also be creating 2 new icons for the mega font hop that you will be able to find permenantly on our side bar so you can take the inspiration journey as often as you like.

Blog Candy Reminder:
There is Mystery Blog Candy being given away! The Mystery is no-one knows which blog is the one that will be giving it away – nope not even the designers! There are 3 Blog Candy prizes each day which will go to 3 random commenter's from three random designers blogs. So, to win some (JR Candy) go check out all the blogs, comment on as many as you can from the two day hop. You have until Sunday at noon EST to leave your comments. Good luck, the lucky winner may be YOU!!! You have 6 chances to win Check back here to the JR blog on Sunday Evening to find out who the six lucky winners are!! Enjoy the Hop!!!


Font Sale- In celebration of our Mega Font Hop we are putting all our all our Font Sets on sale for the first time EVER for Just 7 Days!! The JustRite Font Sale begins today Sept 17th and ends Sept 24th. Take 30% off all our Font Sets - Curlz, Special Occasion, Brayton, Trompe (both upper & lower), Times ( both upper & lower). Original Price $23.95 ...on sale now for $16.77. Plus take 30% off our Horizontal and Vertical Stampers - Original Price 19.95 - Sale price $13.97! But the sale only lasts for 7 Days - How Sweet is that!! The JustRite Font Sale begins Sept 17th and ends Sept 24th!!

Here at the JustRite Blog we are in the middle of designing this fun Monster Bash. Today I am sharing with you the centerpiece for the party. This fun Chocolate Cookie House Kit from Wilton. To my relief the Haunted House came pre-essembled!! Which certainly steamlined the process- no set-up time required for assembling the house. This is a super fun family project, Jack had a blast helping me design the house and is still asking when he can eat my project!

Since this is the centerpiece for the party - the center and the border from the Witch Way to the Treats stamp set expressed the perfect sentiment of most of my hungry party goers. These fun chipboard arrows from Bazzill were the perfect pieces to design my fun road sign. We altered them using a combination of glitter and paper. I used my inverted nestabilitie circles to die cut the orange layer of the stamped image and them used a micron pen to draw in a spider web on the outer edge of the die cut. I just love the whimsical feel of the Haunted Mansion.

For the sign I used Brayton 50 Point Font and inked the image using Memento Tuxedo black ink. To give it a spooky feel I added scraps of spider web borders which were created with the EK Success Spider Web Punch around punch. I used a purple Copic Marker to alter the fancy toothpick which became my sign post.

Here is a picture showing you how the party is coming together:


Next it was time to design a few Halloween Decorations to accent my table. I found this fun candle jar with eyeballs in it last Halloween and just knew this was the perfect accent for my Spooktacular Celebration. I used my Martha Stewart dripping blood border punch for the top of the jar and the spider web punch around for the bottom of the jar.


Using Brayton 50 pt font I created my tag for my jar "Eyes of Newt".


Yesterday I showed you this - what the Spider Web Punch around border looked like

as well as what you can create when you combine that punch with Martha Stewarts coordinating Spider Web Corner. For the top of my Eye of Newt Jar I made a square webbed mat. Next I added a inverted circle die cut of my favorite Halloween paper from Making Memories (it combines text with a spider web). I added a K&C Spider sticker and then stamped the spider web center from the Witch Way to the Treats sent on pale blue glossy cardstock. I used a red cardstock to mat the image - pulling the design elements of my piece together.

Jack gave this piece of my project a huge "Wow mom, that's awesome"....how did you make that!! So I know it will be huge hit at any party. To see my treat bags for the party - visit my personal blog - Polished to Perfection. Enjoy the second half of our amazing Mega Blog Hop and be sure to check back here on the JustRite Blog to see if your are one of the Lucky Mystery Blog Candy Winners.


Debbie Olson
Jerri Kay Jimenez
Taylor Van Bruggen
Holly Simoni
Barb Schram
Terre Frye
Michelle Kovack
Kim Moreno
Catherine Doucette
Kellie Fortin
Kimberly Crawford
Kathy Jones
Michelle Giraud
Angela Barkhouse
Heather Pulvirenti
Tami Mayberry
Jennifer Buck
Keri Lee Sereika
Jami Bova
Laura Davis
Stacey Kingman
Bonnie Sharp
Stephanie Severin
Janine Orchard
Debbie Seyer
Margie Higuchi
Lauren Bergold
Anja Curvers
AJ Otto


Have fun Hopping!!


Keep us in mind....."When it needs to be JustRite".

Thursday, September 17, 2009

It's finally here Day One of the JustRite Mega Font Hop & Font Sale!!

Welcome to Day One of the JustRite Mega Font Hop! We have invited 54 designers from some of our favorite Design & Sketch Challenge Teams to join our Design Team for our LARGEST BLOG HOP EVER!! All 54 amazing designers have created projects using JustRite Font– We have 28+ locations for you to visit today and 28 + tomorrow! You will be blown away by the amazing talent in this Hop!! So grab your favorite caffeine and BE INSPIRED!!
Blog Candy Alert:To give you a little incentive to leave these talented ladies a little love for all their hard work, We have 3 Mystery Blog Candies being given away each day! Do you want to win some candy?? Of course you do – everyone loves candy!!! The Mystery is no-one knows which Designer 's Blog is the blog that will be giving it away – nope not even the designers! There are 3 Blog Candy prizes each day which will go to 3 random commenter's from three random designers blogs. So, to win some (JR Candy) go check out all the blogs, comment on as many as you can from the two day hop. You have until Sunday at noon EST to leave your comments. Good luck, the lucky winner may be YOU!!! You have 6 chances to win check back here on the JR blog on Sunday Evening to find out who the six lucky winners are!! Enjoy the Hop!!!

Now for our BIG ANNOUNCEMENT!! In celebration of our Mega Font Hop we are putting all our all our Font Sets on sale for the first time EVER for Just 7 Days!! The JustRite Font Sale begins today Sept 17th and ends Sept 24th. Take 30% off all our Font Sets - Curlz, Special Occasion, Brayton, Trompe (both upper & lower), Times ( both upper & lower). Original Price $23.95 ...on sale now for $16.77. Plus take 30% off our Horizontal and Vertical Stampers - Original Price 19.95 - Sale price $13.97! But the sale only lasts for 7 Days - How Sweet is that!! The JustRite Font Sale begins Sept 17th and ends Sept 24th!!

For the Hop - here at the JustRite Blog ---we are throwing a Halloween Party. I thought it would be fun to show you how you can use your JustRite Supplies to custom design your own Halloween Party.
I don't know about your kids but mine love personalized things!! So today I am going to show you how to make Spider Web Cupcake Wraps as the first project for our Halloween Party.

If you haven't seen the new Spider web border and corner punch from Martha Stewart --this is one of the coolest Halloween Punches EVER!! To make the Spider Web Cupcake Wraps I used the Spider Web Border Punch. In the photo above I am also showing you what the corner punch in conjunction with the border punch looks like. (You'll see what I am making with it - Friday on my personal blog--can't wait to show you!!).

To make the Spider Web Cupcake Wrap cut a by 8 1/2" x 1 1/2" strip of black paper and use the Spider Web Punch Around Border Punch to create this fun border. Next using Martha Stewart's Glitter Glue (it comes with a brush in the jar - like the brush in a rubber cement jar). Brush the glue on just the web section of the wrap. Add Martha Stewart black glitter. Set aside to dry.
Next using Brayton 50 pt Font I placed the children's names onto the smallest JustRite Rectangular Stamper. I was able to get 4 names onto one block. Next I inked the stamp with Black Memento Ink and stamped it on white card stock. Then I trimmed around each name and using the chisel edge of a lime green Copic I edged the name plates.


Next I used an EK Success Medium Ghost Punch and a Martha Stewart Jack O' Lantern Punch to create embellishments for the cupcake wraps. Then I adhere all the pieces to the cupcake wrap.

Tips: glue all the embellishments onto your wrap and allow them to dry. Next glue the ends of the wrap together. Use a binder clip to hold in place until the glue dries. Your wraps will look like this.

Aren't they cute. My next tip is that you should try your cupcakes in the wrap before you frost them to make sure they fit.

Jack loved this whole project....but just wanted to know how long it would be before he could eat my project. (Boys!!).

Next I used the JustRite Witch Way to the Treats stamps to create Cupcake Picks. I stamped the images with the borders and colored the centers. Then I created a mask using a 1" circle punch and using my Copic Sketch Markers - I airbrushed the outer rim of my stamp images using yellow and green copics. Then I used Glitter paper from DCWV and an SU Scallop punch to make my first mat layer of the pick. The final mat layer was created using Labels One and Black Glitter Paper. Note: Witch Way to the Treats is a LIMITED EDITION SET----if this is on your Wishlist...you need to purchase it this week....as we will be sold out of this Limited Edition before the end of the month.


To create the eyes on my cupcakes I used Brown M& M's and white and black frosting. For the mouths I used candy bats leftover from tomorrow's project.


For Emily's Cupcake Pick - I used the Medium Bat Punch from EK Success and glittered the bats wings.


I also used a small bat from the EK Success Bats Punch (it has 3 different size bats) and added it to the gone batty center. The cupcakes simply sit in the cupcake wraps making it easy for the children to pick up the cupcakes and dig in.


Now maybe you haven't considered investing in font...or maybe it's not at the top of your JustRite Wish List... but a little birdie tells me that after you see what 54 top designers do with our font ....you might not only want it....YOU ARE GONNA NEED IT!! And it's on Sale!!

If it is your first time visiting the JustRite Blog---thanks for stopping in!! We have a very unique interlocking stamp system. Which you will love. This week we are focusing on font!

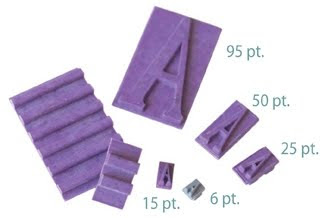
JustRite sells font sets which contain font in 3 sizes - 95 point, 50 point and 25 point. Often people ask what is a point. Point is a term used to describe the height of a font - If you write in a word document you can choose the size of your print by selecting the font size and it is calibrated in points. So the larger the number of the font the larger the font is. Our 95 point font is approx. 1" tall and is the largest font shown in the above picture.

Here is today's line up of Fabulous Designers!! Simply click on the links below to begin your Inspiration Journey on the JustRite Mega Font Hop. Don't forget to leave comments on all the blogs including the JR Blog....because we have 3 Mystery Blog Candies to giveaway this weekend. These links are now direct links to the blog hop projects.

Michelle Wooderson
Sankari Wegman
Heidi Blankenship
Eva Dobilas
Beate Johns
Sharon Harnist
Barbara Anders
Sharon Johnson
Deb Saaranen
Becca Feeken
Kazan Clark
Lauren Meader
Tammy Hershberger
Linda Beeson
Jenny Gropp
Lori Craig
Tanis Giesbrecht
Jenn Balcer
Lisa Somerville
Karen Maldonado
Pamela Smerker
Karen Taylor
Latisha Yoast
Julie Overby
Mary Pfaff

Keep us in mind....."When it needs to be JustRite".

Wednesday, September 16, 2009

Barb Schram - Day Three-- When I visit Grandma

Don't forget that the Mega Font Hop starts on Thursday at 8 am EST!!...It's a 2 day event with 54 of your favorite designers!! They'll be blog candy and an announcement that you won't want to miss!! Today Barb has a terrific project featuring her Grandson..who is just adorable. Grandma will be sharing more photos of her little guy on her blog today as well - so if you have a chance click through and check out Barb's blog Explore, Dream ,Discover today.

When I Visit Grandma


When our grandson, Kaylub comes to visit, I know his Mom wants to have all the details of his stay! You know…what time he ate, how many formula ounces he consumed, length of sleeping time, etc. Hence, the idea of a notebook came to mind and this little Kaylub creation was designed! I purchased the notebook (in a three pack) from Walgreen Drugstore some time ago, waiting to be utilized for just the perfect project! I was drawn to the notebook because of its cover colors and also the thickness of the cover, making it quite sturdy and durable. I created a photo pocket by trimming down a small clear envelope to size needed. The pocket is attached with scor tape. The pocket opening is on the left, so the cardstock framed photo doesn’t have a chance of falling out.


The front and back outside cover is stamped with watermark ink. I love how this adds so much interest without taking away from the precious photo! Of course, I may be just a tiny bit biased! You have to admit though, he’s darling! The twine you see at the top of notebook is tied onto a paperclip to hold pages together. This makes finding the most recent entry a snap.


To personalize the notebook, I utilized JustRite’s Times New Roman font, both uppercase and lowercase. The “K” is 95pt uppercase font. Having the versatility of Times New Roman in upper and lower case is another JustRite font feature I love! After stamping the letter “K” and positioning my label punch, I created my tag. I shaded the label edging and added green eyelets to finish. The label is attached with foam dimensionals.


I made use of a leftover mini notebook page from a scrapbooking kit, perfect to stamp my words on! I used both JustRite Times New Roman 50pt, upper and lower case font. Setting and stamping the words individually and randomly, made it easy and no worries about misplacement! A little heart with bakers string placed on a punched circle completes the overall page design.

I used my JustRite Oval 1 3/4” x 2 5/16” wooden stamper for all letter and word stamping. Pictured above is the Times New Roman 50pt uppercase font. I’m pleased with the look of the upper and lower case font…it adds just enough interest to keep your attention to the end of the statement.

And here is a close up the stamped word, Grandma. Perfect sized notebook to tuck in a diaper bag, record all necessary information (Grandma gushing included!), and create a log of precious memories in the process. It’s certain to become a keepsake, one created with love to remember treasured visits with Grandma!

Get ready for a spectacular JustRite Font Blog Hop, this Thursday and Friday! I will be hopping too, and return next Monday & Tuesday! Take good care!

Supplies:
Stamps
JustRite Times New Roman Uppercase Font Set, JustRite Times New Roman Lowercase Font Set, JustRite Oval 1 3/4” x 2 5/16” wooden stamper ,Foam decorative stamp
Ink – Versamark watermark, Adirondack Espresso
Paper – Brown, Cream Cardstock, Mini notebook page from scrapbooking kit
Accessories – 3 ¼” x 5 ¼” Notebook, photo, 3 ¼” x 3 ¼” clear envelope, misc. heart button, scrap twine & bakers string, paper clip, label and ¾” circle punch, sponge dauber, eyelets & Crop-a-Dile, scor tape, foam dimensionalsKeep us in mind....."When it needs to be JustRite".

Tuesday, September 15, 2009

Day Two with Barb Schram - JustRite Playtime

Today Barb has the sweetest personalized card and a gift using JustRite Font!! The JustRite Mega Font Hop starts on Thursday at 8 am EST and is a Two Day Event with a Big Announcement - you won't want to miss!! I can't wait to see what this team of SUPER Talented women make!!

JustRITE Playtime Fun


One of the features I like best about JustRite fonts is they can be used alone or added to any creation I want! For my design today, I decided to utilize JustRite’s Brayton Font to create a name plate on my card. A long overdue baby card and gift is finally complete, Hooray! Not overdue, in the sense of baby being overdue, but meaning finally getting this gift completed! Isn’t this little guy the cutest? He is stamped with Memento tuxedo black ink and colored with Copic markers.

Adding letter blocks to spell “Cooper” seemed very appropriate for a bit of room decor! After all, the little guy is playing with blocks on the card! The wooden blocks measure
1 ½” and are painted with white acrylic paint. The card’s ring frame is thin chipboard covered with blue cardstock, and painted with white acrylic paint. I sanded to bring back some blue, and then cut with Spellbinders Classic circle dies.

For letter and name stamping, I used my JUST RITE Brayton Font and 1 3/8” x 3 ½” rectangular stamper. The 95pt. font on the blocks and the 50pt. font on the card’s name plate.

All JustRite Stampers boxed font sets include THREE font sizes. Gotta love that! For this project I used the 95pt to create my blocks.
I stamped first and then positioned my 1 3/8” square punch to cut out the patterned paper squares. Much easier that way! I proceeded to punch out all patterned paper squares for the blocks, and adhered with Mod Podge. Using my rubber brayer aided in securing the squares and removing any air bubbles. After blocks were dry, I sanded and lightly misted with matte finish sealer.
Cooper Name Plate was created using 50pt. Font I trimmed the name plate to fit my card design and clipped corners for added interest. Adhesive black pearls complete the Brayton font “Cooper” name plate for a finished look. Glue dots hold the name plate in place.

I hope you make room for some JustRite playtime fun, adding that personal touch to your creations! Create home décor, attach a name, or add a special message, making your creations JustRite! Take good care and I’ll be back tomorrow!


Supplies:


StampsJustRite Uppercase Brayton Font, 1 3/8” x 3 ½” Rectangular Stamper, GinaK Designs little guy at play
Ink – StazOn Black, Memento Tuxedo Black
Paper – Papertreyink Stampers Select white, Spring Rain, and Men of Life patterned papers
Accessories – Papertreyink spring rain twill, Misc. stripe ribbon and buttons, Spellbinders Classic circle dies, chipboard, needle and string, adhesive pearls, ticket corner punch, Glue dots, foam dimensionals, Mod Podge, Acrylic white paint, sponge brush, Sanding block, Matte finish spray sealer,
Copic markers: Y15, Y17, Y21, YR68, R27, R29, E00, E04, E31, E33, B21, B24, BG10, YG03, YG06, RV11, C1, C3, 0 (colorless blender)


Keep us in mind....."When it needs to be JustRite".

Monday, September 14, 2009

Day One with Barb Schram- Pumpkin Dip

It is Font week this week at JustRite!! We are going to knock your socks off this week. We have a full week of projects planned using JustRite Font - Monday thru Wednesday Barb Schram is our guest blogger. As always she has lots of fun fabulous economically gifts planned to share with you this week (Barb will be back to join us next week on Monday & Tuesday) because we will be interrupting her guest week to bring you a Mega Font Hop so big and so jammed with projects from 54 of your favorite designers that it will be a two day event. We also have a Huge Announcement on Thursday during the Font Mega Hop.... so don't miss it!!

So here's Barb... GOING FOR A DIP

PUMPKIN DIP! That is! Last year I discovered this dip recipe on SCS (Sandy Galley), and it is fabulous! ( the recipe is waiting for you at the end of this post). Fall is definitely in the air and before long the Thanksgiving season will be upon us! If you are in need of a gift for hostesses, a special neighbor, or even teachers, this could be it! I wanted quick packaging and found canning jars work quite well. There are many sizes of “Ball” brand canning jars. I chose a wide mouth, half pint, contemporary styled jar with platinum band/lid and found them at my local hardware store.

Of course, the jar lid was just too plain leave as is, so I was off to embellish! I stamped the pumpkin image from JustRite’s Autumn Blessings Set with Memento tuxedo black ink. Using my 2 ¼” x 3 1/16” oval wooden stamper, I stamped the pumpkin center image only. This allowed die cutting my image into a circle. I used a Spellbinders Classic circle die to accomplish this!
Copic Markers used: YR09, YR65, YR68, E09, E31, E33, YG03, G07, G21, G24, and 0(colorless blender). I love the pumpkin image and leaves, suggestive of what is waiting inside the jar!


Utilizing JustRite’s 50pt. and 25pt. Curlz font, I created a tag for my pumpkin dip jar. You can see the letter setup in above photo. Placing the letters on my 1 5/8” round wooden stamper worked well, stamping with same ink as previously mentioned.
The Spellbinders Tags 5 die had the right size tag among the five to choose from. I stamped “Pumpkin Dip” first, and then positioned my tag die for a perfect fit. I thought JustRite’s Curlz Font was just right; it carried the whimsical theme of the curls surrounding the pumpkins and leaves, don’t you think? Tag is tied around bow center with bakers string.

THANK YOU, JustRite! I am thrilled to be guest blogging a few days this week and next! Especially when we have the Font Blog Hop to look forward to! This Thursday & Friday! Take good care!
Now for the recipe!

PUMPKIN DIP RECIPE (Sandy Galley)
1- 8oz. softened cream cheese (any brand, regular type; not reduced fat, etc)
2-7oz. jars Kraft Marshmallow Crème
1-15oz. canned Libby’s Pumpkin
1 Teaspoon Cinnamon
1 Teaspoon Grated Orange Rind (I used in the jar spice kind, but you can use fresh if you want!)
Mix cream cheese and marshmallow cream until smooth. Add remaining ingredients and stir well. Serve as a dip accompanied with vanilla wafers, thin chocolate wafer cookies, graham crackers, bagels, sweet breads, muffins, apple slices! Endless possibilities! Makes 4 Cups. Store leftover dip in refrigerator.

Thanks Barb, for a terrific project complete with a recipe!! Be sure to stop back in tomorrow to see Barb's next creation...you are gonna love it.

Keep us in mind....."When it needs to be JustRite".

Tuesday, September 8, 2009

More Great Back to School Projects


As you might have guessed from our daily absence---things are more than a little busy here at JustRite. We have tons of things going on for the month!! You are going to love all the inspiration. Angela still has a great calendar project to share with us this week, but I couldn't resisit showing you these other great Back to School Projects that you might have missed in our JustRite Google Shared Reader over the past few weeks. So I am interrupting Angela's guest blogging posts for the next two days. Tomorrow we have some very exciting things going on in the blogosphere to share with you, and then Angela will be back.

First this the Super Sweet Card Angela Barkhouse made for her daughter's first day of 4th grade.

Angela designed her entire stamped image using Brayton Font & Times Roman Font and her Small Harmony Rectangular Stamper. For all the details on how Angela created this card visit her blog - Snippets of Paper

Did you see Sharon Harnist's fun back to School Project - using an image from our Christmas Treasure set? I am not sure how many of you have heard or seen the Staples back to school commercial - which says "Celebrate the Most Wonderful Time of the Year" - Back to School!!

Well it just so happens that this is the sentiment in our Christmas Treasures Set. For all the details visit her blog - Paperfections.

The next project I wanted to give a shout out to is this fun project that Carolyn King designed by combining our stamps with the new Gina K Back to School stamps.


Once you start using your JustRite Fonts and Demi Phrases - you will find yourself adding them to everything!! Carolyn used her 2" stamper with her 15 point font to create JustRite tabs with each grade of school for her sweet book. Visit Carolyn King's blog post - My Blog for all the details.


Enjoy your peaceful and quiet homes today...I know you are all doing a little HAPPY DANCE!!


Keep us in mind....."When it needs to be JustRite".