Tuesday, November 25, 2008

Day Two with Julie Buhler

It's day two with Julie Buhler and today's project comes with a little inspiration from Julie's kitchen. Julie used an image from our Baking Stamp Ensemble.


Which is one of 6 items that you can buy from the JustRite Website in our Buy One Get One Free Sale. Sale ends November 30th. So tell Santa, tell your friends about our terrific sale.

At this time of year, a lot baking is being done, and whatever comes out of the oven often ends up as a gift. I like to give my baking away in something that will be enjoyed, as much as the food. Last year, I etched glass plates for them to use after. This year, I was inspired by Lauren, and created a box to give away my goodies.


Everyone buys two bite brownies, but did you know it is so easy to make your own? Just by a brownine mix, and instead of putting it in a pan. use a mini muffin tin!! Then, bag them up and put them in a box as delectable as the treats inside. This box holds 10 or so of this sized treat - it is pretty big.


Since I needed a box, I designed my own template. On the top, I used the 2 5/16 circle Harmony block and the baking stamp ensemble. I made a scallop circle and then stamped the border on the vanilla. I stamped the Fudge center with chocolate ink, and added stickles to the chocolate chips (or hearts ?), and paper pierced between each one. I used my cutter kit on the vanilla and put it all together on my lid.


This is a front view, but you have so many options with this set!! Fill it with a hot chocolate mix, christmas cookies, chocolates, etc. and then pick the stamp to match. I covered the box with some baking patterned paper I found. My lid is held on by some Basic Grey magnets again, since I didn't want a ribbon over the top to hide my lid topper. The packaging turn the gift into a gourmet treat!

Supplies :


JustRite Stamps : JB 08116 Harmony Classic Circle 2 5/16 stamper, JB 08130 Baking Stamp Ensemble
Ink : chocolate chip, creamy caramel (Stampin' Up!)
Paper : Chocolate chip. Creamy Caramel, Very Vanilla (Stampin' Up!), Bake-Off Paper (Flair - All That Scraps)
Accessories : Stardust Stickles, Basic Grey Magnets (All That Scraps), vanilla tafetta, cutter kit, dimesionals Coluzzle, scallop punch, corner rounder punch (Stampin' Up!)


Keep us in mind....."When it needs to be JustRite".

Monday, November 24, 2008

Day One with Julie Buhler

Welcome to day one with Julie Buhler. Julie has a terrific project designed to get you organized this Holiday Season.

My purse is a dumping ground - literally!! As I shop throughout the day, my receipts are just tossed in randomly. Then when I want to return something, I pretty much have to dump out my purse, to find the one receipt among many other receipts, toys, gum, garbage, well, you get the idea. So, being the paper crafter I am, I don't think, "What could I buy", I think "What could I make?". And since this is the beginning of the hard core shopping season, I thought it would be perfect to show you.
Here is the front view.
Here is the top view.

Of course, it had to be pretty if I was going to be pulling it out in the store, right? This is my Receipt holder. I used CS and patterned paper, folded it all up, making my own file system. I used the JRS Harmony Rectangle block, and the Brayton font to stamp the word on the top of the holder. I then sponged the edges in the same ink, to go with the distressed feel of the patterned paper.
For my charm, I cut a piece of poly shrink with a tag die. I stamped the letter "J" with the Trompe font, and then shrunk it . I added it to the front of the holder using and jump ring and some silver cord. I then tied it around the ribbon that I used. To make it a little fancier, I scalloped the edges of the flap, and placed some adhesive gems in each one.

Now, the inside of the project, the whole reason I made it. I used envelopes cut in half to make my file system. I used the Brayton font and the small letter set on the 1 5/8 Circle Harmony block. Then I punched them out and added them in the order of priority shopping...hehehe. I had two different people who saw this say theirs would be in the same order...they are winners in my book *wink*. As you can see under the ribbon, I used the Basic Grey magnets to hold it shut in my purse. It wasn't that hard, I had it pulled together in an afternoon.

Supplies:
JustRite Stamps: JB 08100 Brayton Font, JB 08080 Trompe Font, JB 08110 Harmony Rectangular Stamper, JB 08115 Harmony Classic Circle I, JB 07275 Small Letter Set
Paper: DP and cardstock
Accessories:adhesive gems, envelopes, Basic Grey Magnets, Ribbon, Polyshrink Film, Jump Ring, silver cord


Keep us in mind....."When it needs to be JustRite".

Sunday, November 23, 2008

Welcome Guest Blogger Julie Buhler


JustRite is very excited to announce that the incredibly talented Julie Buhler will be our guest designer this week. Be sure to check in everyday to see what Julie has created. For tons of great project ideas visit Julie's blog Paper Pleasing Ideas. Here are just a few of the great projects that Julie has already designed and shared on her blog using her JustRite Product. Each photo has been linked back to Julie's blog post so click through to her blog for the instructions.


Here is a beautiful card for a Bride using JustRite Font.


A great masculine Birthday Card using the JustRite Small Letter Set with the Harmony Circle I Stamper.

Here's a great card box for JustRite Organization. What a great place to store your premade cards by month for every occasion. Yes, imagine being organized and having cards made before you need them!! Julie will certainly inspire us all to get organized this week.

Here is the beautiful box that Julie designed for the final round of the Stampin' Champion Contest and the coordinating card.
Remember you can click on any photo to visit Julie's Blog Post for all the details on how she created these FAB Projects!!

On to our interview with Julie.....


Tell us where you live.
I live in Saskatchewan, Canada. My husband and I just bought a quarter-section of land and built our dream home.

Julie for those of us who live in the United States what is a quarter-section?
A quarter section is a parcel of land that is 1/2 mile by 1/2 mile, or 160 acres.

Tell us about your family.
I am married to my dream guy and together we have 2 very busy, rambunctious but wonderful boys.

Tell us how long you have been stamping.
I was invited to a Stampin' Up! show in June of 2005. I signed up to be a demo in October and the rest is history!! It is most often a daily thing, and it keeps me sane.

Tell us where you do your stamping (studio,spare bedroom, basement, kitchen table)
My husband and I just built our dream home. My little spot is in the basement, where I got to have my own craft room!! I hold my classes in there twice a month, but otherwise, it is the perfect place for me to make a mess...hehehe

Tell us what is your must have stamping tool.
I'd have to say it changes on a daily basis and really I couldn't just pick just one. I do use my punches alot, but also my coloring products, my piercing tools, cutter kit, Big Shot, well, you get the idea...LOL

Tell us how long have you been blogging.
In January, it will be my second blogiversary, and I love every minute of it! I enjoy meeting new friends, some only in cyberspace, but some I've even gotten to see personally. I relish it as my "girl time" in my house full of boys!7. Tell us what your favorite Paper Company..
I would have to say that my FAVORITE paper company is Stampin' Up!. I love the fact that the paper, ink, accessories, etc, all match!! You can't get much better than that.

Tell us besides JustRite, what are you currently addicted to .
I totally LOVE to embellish - and whatever is within reach on my desk is on my project. Whether it is ribbon, brads, glitter, embossing, it is ALL good!

Tell us your favorite paper crafting season and why.
I love paper crafting for people, not a season. But the most fun for me would be Christmas - that is the best time to enjoy family and friends! And since that is who I craft for, I go all out for them at that time of year!! Birthdays are good to, since you can personalize a project for them on their special day.


Reminder the JustRite Buy one get one free sale ends November 30th. To see all the details of the sale and to begin shopping click here


Keep us in mind....."When it needs to be JustRite".

Friday, November 21, 2008

Day Five with Sharon Johnson - JustRite Accordion Tags

All we can say here at JustRite is WOW!!! WOW!!! WOW!! It has been the most amazing week with the VERY TALENTED Sharon Johnson. Are you addicted to Sharon's work yet?? If so please be sure to visit her at her regular home No Time to Stamp. Sharon we can't Thank you enough for all the Holiday Inspiration !! Girl you REALLY ROCK!!

In Celebration of Sharon's Unbelievable week here on the Just Blog we are having a huge
Thanksgiving Sale. Buy one of our favorite products and get the second one free.( 5 different items are included in this sale) For more details on the items that are on sale see Thursday evenings post by clicking here. To start your shopping spree click here

My final project for this fun week at the JustRite Blog wishes you all a Merry Christmas!!! Oh, what a fun little project. This is an accordion card measuring 3.5” high x 30” long. It’s so much fun to decorate up all of these little 2 x 3.5” canvases!!! Now this wasn’t the easiest project to photograph, so these pictures are pretty much only parts at time, but I think you’ll be able to see it well this way. I tried to get a full shot of the entire project for you here.


My 15 panel accordion card spells out MERRY CHRISTMAS – how fun. To spell out the MERRY CHRISTMAS I used JustRite’s Clear Letters. I love the size of them and the fact that you can actually SEE where you are stamping. It was so easy to stamp the letters onto the 1 ¼ “ squares I made for them. I’ll include full instructions at the end of this post, but I’ll show you the entire project first.

Here we have the MERRY. As you can see, I used all SU product, except for the Clear Letters by JustRite and the small words spelling out the message, which are from the Christmas Ensemble by JustRite. I decorated each panel with Ski Slope DP, edged in gold paint pen, added my letter panels and decorated. Aren’t the jingle bells cute! They are run through an SU Jumbo Eyelet set on top.

One panel separating the 2 words holds a Christmas tree from Christmas Classics – how fun. It is white embossed. I made the snow by tearing a piece of white, covering it with Liquid Applique, sprinkling on Dazzling Diamonds and then heat setting. LOVE that look!!! My tree also has a star on it, again sparkling with Dazzling Diamonds.


All the little words in white that run across the panels give a message – it is *Special Friends and Hugs and Kisses and Holiday Wishes*. I merely stamped those 2 stamps from the Christmas Ensemble onto white and cut out the words in a haphazard style, ran them through my Xyron X and stuck them on. I think it makes it fun!!!


And here’s the end of the line!!! The stars are from Christmas Classics, white embossed, and punched with the large Star Punch – quick and easy on a project like this. The snowflake from Scandinavian Season is also white embossed onto red paper, then punched with the 1 ¼” punch and matted with the 1 3/8” punch.


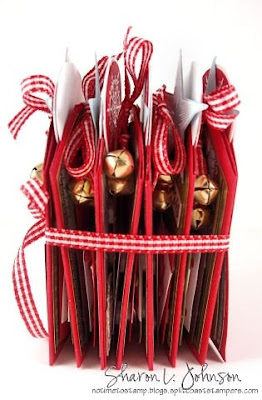
Here’s a look at the accordion tag all bundled up and tied with a ribbon, ready to give to someone! I would have made a box for this accordion tag to be presented in, but just ran out of time. If anyone would like a template for a box for this tag, just indicate so in the comments below and I’ll get one made up and posted on my Blog next week.
Just showing you a side view of the bundled up tag – fun!!!


Ok, now on to a bit of instruction in case anyone would like to try this. We’ll start with cutting and scoring our paper. Cut 2 strips 3.5 x 11 and 1 strip 3.5 x 10.


Starting with an 11” sheet, we need to score every 2 inches, flipping the paper each time as we are creating mountain and valley folds. I used my Scor-It Mini. Score the first time at 2”. Flip your paper over, place your score at the 2” marking and score again. Flip your paper again, move your LAST score to the 2” marking, and score again. Continue until you only have 1” of paper left – this is your tab to join the pieces together. Repeat for 2nd 11” sheet. When you score the last 10” sheet, it’ll work out perfectly with no left over paper.


To get the tag shape on top I made templates. Using a gridded surface with a diagonal line (I used my Scor-Mat) you can draw the diagonal, cut your template, then lay your template on top of your red base and cut easily with scissors. To make the DP panels for the base, cut the pieces 1 ¾ x 3 ¼. You’ll have to make another template for them as they are smaller. Do it in the same way as above. Once the DP pieces are cut and corners clipped, line all the edges with a Gold Paint Pen. If you’ve never done this before, check out this little tutorial written by Debbie Olson – it’s exactly how I do it and it words fabulously!!!


Put a strong double sided tape on the tabs and connect all the pieces, as shown in photo. Pay attention to your mountains and valleys so you get them connected properly.


Once your DP pieces are set to go, adhere them to the red card base you made. Now make up your letter panels with the Clear Letters. I cut my letter squares to 1 ¼” square, stamped my letters in Real Red, then cut my mats to 1.5” square. As you can see, I matted them in all random ways, just for fun, and used a colored brad on each for decoration. My letters are adhered to the base with 4 SU Dimensionals on each. My stars on top are mounted with 1 Dimensional. The snowflakes are taped on the front, then another white circle was taped on the back, just to give a cleaner appearance. The jingle bell ribbon is run through a jumbo eyelet and tied in to a bow.
And that should about do it!!! Hope you give this a try. You could choose a shorter word --- like JOY – LOL!!! Sure would have made the photography a lot easier – LOL!!! Whatever you choose have fun, and I’d sure love to see what you come up with!!!


I’d just like to give JustRite a HUGE THANK YOU for having me this week – it’s been fun and pushed me to get some projects done that would probably be still only floating in my head, and for that I’m grateful!!! I’ve been having so much fun with all my JustRite products this past year – if you don’t have any yet, I strongly recommend you give them a try – a simple Monogram Starter Kit would be a good first choice to get your feet wet, and after that you can dive right in!!!! (And I just noticed they are having a HUGE sale – WOW!!!) Thanks everyone - -it’s been fun!!! See you on my home turf soon!!!


JustRite Stamps: Clear Letters and Christmas Ensemble used with Harmony Classic Circle Stamper III
SU Stamps: Christmas Classics and Scandinavian Season
Paper: SU Real Red, Old Olive, Chocolate Chip, Baja Breeze, Ski Slope DP, and PTI White.
Ink: SU Real Red, Versa Mark, Versa Fine Onyx Black, Sanford Gold Coat Pen.
Accessories: Scor-It, White Embossing Powder, Glue Pen, Dazzling Diamonds, Liquid Applique, Brads, Jumbo Brass Eyelet, Gingham Ribbon, Jingle Bells, Dimensionals, Two Sided Tape, Cropadile, and Punches: 1 ¼”, 1 3/8”, Small Star, Large Star.


Keep us in mind....."When it needs to be JustRite".

Thursday, November 20, 2008

Thanksgiving Sale - Buy one get one absolutely free

Happy Holidays!! We have a great Promotion for you this Thanksgiving!!! We know everyone's budgets are tight and that you may have a few things on your wish list that you wish you already owned!!Especially since Sharon Johnson has been teasing us all week with outstanding eye candy.

Our Sale starts now and ends promptly on November 30th. Buy any one of the following items and get the second one absolutely free!! (Think of it as our one for Santa and one for ME sale)

The Perfect Gift ideas just got twice as Sweet!! Expand your collection and get a free gift for your friends & family. Or Buy 2 Gifts for the prize of 1! For those of you who have been waiting to purchase our products and just didn't know where to start- any of these selections would be a great starter kit.

The Christmas Stamp Ensemble and the Harmony Circle Stamper III wooden block


JB-P8150
Two Christmas Ensembles & Two Harmony Classic Circle III Stampers 3 ¼”
These cheery holiday borders & centers can be used for making cards, personalized gift or festive packaging.Each Set Includes: 6 Borders, 6 Centers , 3-1/4” Wood Stamper Included

Regular Price $ 51.80GET 2 FOR $25.90

The Baking Stamp Ensemble and the Harmony Classic Circle II Wooden Block


JB-P8130
Two Baking Ensembles & Two Harmony Classic Circle II Stampers 2 5/16”
Perfect for creating tags or packaging for all your favorite homemade recipes. Each Set Includes: 6 Borders, 6 Centers, 2-5/16” Wood Stamper Included

Regular Price $ 41.80 GET 2 FOR $20.90

Monogram Stamper Kit:


JB-P8310
Two Monogram Stamper Kits
Each Set Includes: Times New Roman Font (95pt and 50pt), 4 interchangeable borders & centers, Reversible ink pad (one side black ink), Works with Curlz, Damask and Special Occasions Deluxe Kits
Regular Price $73.90 GET 2 FOR $36.95


Our Special Occasion Deluxe Kit:


JB-P8250
Two Special Occasion Kits
Each Set Includes: Stamper, 3 borders, 3 centers, a 95pt Curlz Font Set with Symbols & Flourishes, Two 50pt Curlz Font Sets w/ letters, numbers & symbols, & Stackable Type Storage Container Our Curlz Deluxe Monogram Stamper Kit

Regular Price $45.90GET 2 FOR $22.95

Deluxe Curlz Monogram Stamper Kit


JB-P8240
Two Curlz Deluxe Kits
Each Set Includes: Stamper, 3 borders, 3 centers, a 95pt Curlz Font Set w/Numbers & symbols, Two 50pt Curlz Font Sets w/ letters,numbers & symbols, & Stackable Type Storage Container
Regular Price $ 45.90 GET 2 FOR $22.95
Our Damask Deluxe Monogram Stamper Kit

JB-P8230
Two Deluxe Damask Kits
Each Set Includes: Three interchangeable “Damask” borders, Times New Roman 36 Character Font Set in Upper Case 95pt plus Bonus Flourishes & Symbols, Stackable Type Storage Container.
Regular Price $ 35.90 GET 2 FOR $17.95
All orders will ship in 24 hours (during the normal business week).
Tell Santa!! Tell your friends Sale Ends November 30th. Split an order with a friend and you each save 50% on your new toys!!!!
Stop back in later to see Sharon's final guest blogging project you won't be disappointed.
Keep us in mind....."When it needs to be JustRite".

Wednesday, November 19, 2008

Day Four with Sharon Johnson - A Simple Gift

We can't thank Sharon enough for all the outstanding projects she has designed for JustRite this week. Today's post will show you how to transform paper into a beautiful personalized monogram stationery gift set. Sharon will be showing you how to recreate every detail including designing your own box.

I could not possibly let my week at JustRite pass without doing a set of monogrammed cards. After all, the ability to so easily produce beautiful monograms is what drew my eye to JustRite in the first place, so today I have prepared a simple gift of monogrammed note cards – appropriate at any time. Also, they are simple to make during this busy time of year and would be a well-received gift. I intentionally stayed with basic layouts and minimal embellishments to make this a very do-able project this Christmas season. I also included a simple box, tied with ribbon, to make the gift of cards seem even more special. Here’s the entire set.


I have instructions on how to make the box at the end of this post, but I’ll start by showing you everything first.

There are six cards in this set. These three are made with brown mats on a white base. Each is slightly different. I really wanted to use Bella Rose paper by SU, but as it’s been my favorite paper there isn’t much left, so I was drawing on small pieces to come up with enough for this project, and I just made it!!! For most of these cards I used a 2” strip of the brown dotted DP and just positioned it differently on each card. And on all the cards my brown and pink papers are separated by a thin strip of pink cardstock. Love that look and I do it often.


Here are the other three cards. These cards have no mats. The paper is just adhered to the white base. I am really loving this style of card lately. In addition to being appealing to the eye, they require less paper and less work, and that’s a good thing!!! My embellishments were kept simple. My monograms were cut, matted and framed using my Petite Circle Nestabilities by Spellbinders. I added two tiny pearls to each monogram and a little taffeta bow on top of each monogram. I did, however, pop my monogram up on SU Dimensionals. Just wanted a bit of elevation. Even though they are simple, I think they are pretty and I hope the recipient likes them!

And here’s a look at this simple box for my set of 6 cards. My box is 1 ¼” high and perfectly holds 6 envelopes and these cards with their one layer of SU Dimensionals. It would easily hold 8 cards, or probably even more, if the cards were totally flat. This box is designed that you must open the ribbon to open the box. The tag is adhered to the box, with the ribbon in between, so even when the box is opened, the ribbon stays attached. Take a look at the box when opened.

See what a perfect fit? I think in this photo you can also see the tiny pearls on the monograms and you can also get a good view of the tag on the box. The tag actually opens like a card, and we’ll get to that in a bit.

I used several different JustRite products to make this simple gift set. The monograms were made using the Damask Border Starter Kit. But rather than using the Times New Roman font that comes in the kit, I chose to use Trompe Font for my monogram. And I now see I forgot to include the Trompe Font box in my photo – sorry! To make my tag I used the Harmony Classic Circle II Stamp Ensemble (With Love), and for my To and From which is stamped on the inside of the tag I used Brayton Font with the Harmony Rectangle Stamper Set. It’s really great how well all of these products work together and build upon each other.

I'd like to show you how easy it is to make this little tag. First of all I stamped my sentiment and made the tag front, the decorative part. Once that was done, I took the same die that I used for the largest layer on the tag front, and used that to make my little card/tag base. The base of the tag, which opens like a card, is done with that die. I folded my paper, just like you’d fold a card, then when I positioned my Nestie onto the paper, I made sure that the top portion of the Nestie was OFF the paper. This way it doesn’t cut through and we end up with a fold, or a little card. And since we used the same die, our decorative tag top fits perfectly onto the tag or card base. Adhere it on and you are set. Take a look.

I then added a pearl and bow and stamped the To and From on the inside. Cute as can be!! As I said above, I did adhere this tag permanently to my box top, but these cute little cards could be used for just about anything! Now on to the box.

This is a simple box to make and it takes only 2 sheets of 8.5 x 11 cardstock – less actually, you’ll have leftovers! I did make mine of cardstock and then covered it with the Bella Rose DP to match my cards, but you could just as easily make the box out of DP and avoid that one step. I just didn’t have enough DP to actually make the box out of the DP. Here’s the measurements:
Cut box base 8 3/8 x 7 – score all 4 sides at 1 ¼”
Cut box top 8 ½ x 7 1/8 – score all 4 sides at 1 ¼”
I set the stopper guide on my Scor-It to 1 ¼” and quickly scored all sides perfectly uniform. By having an adjustable stopper guide on the Scor-It you can easily set it to whatever measurement you need – a feature I really love, especially when doing boxes when you need consistent scores on all sides.


Once scored you need to cut your slits where the box will fold to form your tabs. As you’ll notice from the photo, I actually cut out the entire width of the score, rather than just a slit. Doing this ensures that your tabs will fit perfectly and nothing will get hung up. Add tape to your tabs as shown in the photo on the RIGHT side of the box. They’ll end up on the inside of the tab on the inside of the box when you fold it into shape.
If you are going to make a plain box and then cover it with DP, the time to do it is BEFORE you adhere your box into shape. Do it while the box is still flat – just makes life much easier! After your DP is applied, THEN you can tape your box into shape and continue to decorate as you wish.
I can’t tell you how much I have enjoyed making monogrammed projects during this past year. They are some of my all time FAVS both as to simplicity and for just a general WOW!!! factor! Who doesn’t LOVE to get something made especially for them!!! I hope you have some monogram stampers and are able to give it a try!!! I know it’ll turn out JustRite!!! Thanks for looking!!!
Supplies:
JustRite Stamps:
JustRite Damask Border Starter Kit, Trompe Font, Brayton Font, Harmony Rectangle Stamper Set, Harmony Classic Circle Stamper II Ensemble
Paper: PTI White, SU Pink Pirouette, Chocolate Chip, Bella Rose DP
Ink: Versa Fine Vintage Sepia
Accessories: Scor-It, Petite Circle Nestabilities by Spellbinders, Kaiser Pearls, SU Pink Taffeta Ribbon and Chocolate Satin Ribbon, SU Ticket Corner and Corner Rounder Punches


Keep us in mind....."When it needs to be JustRite".